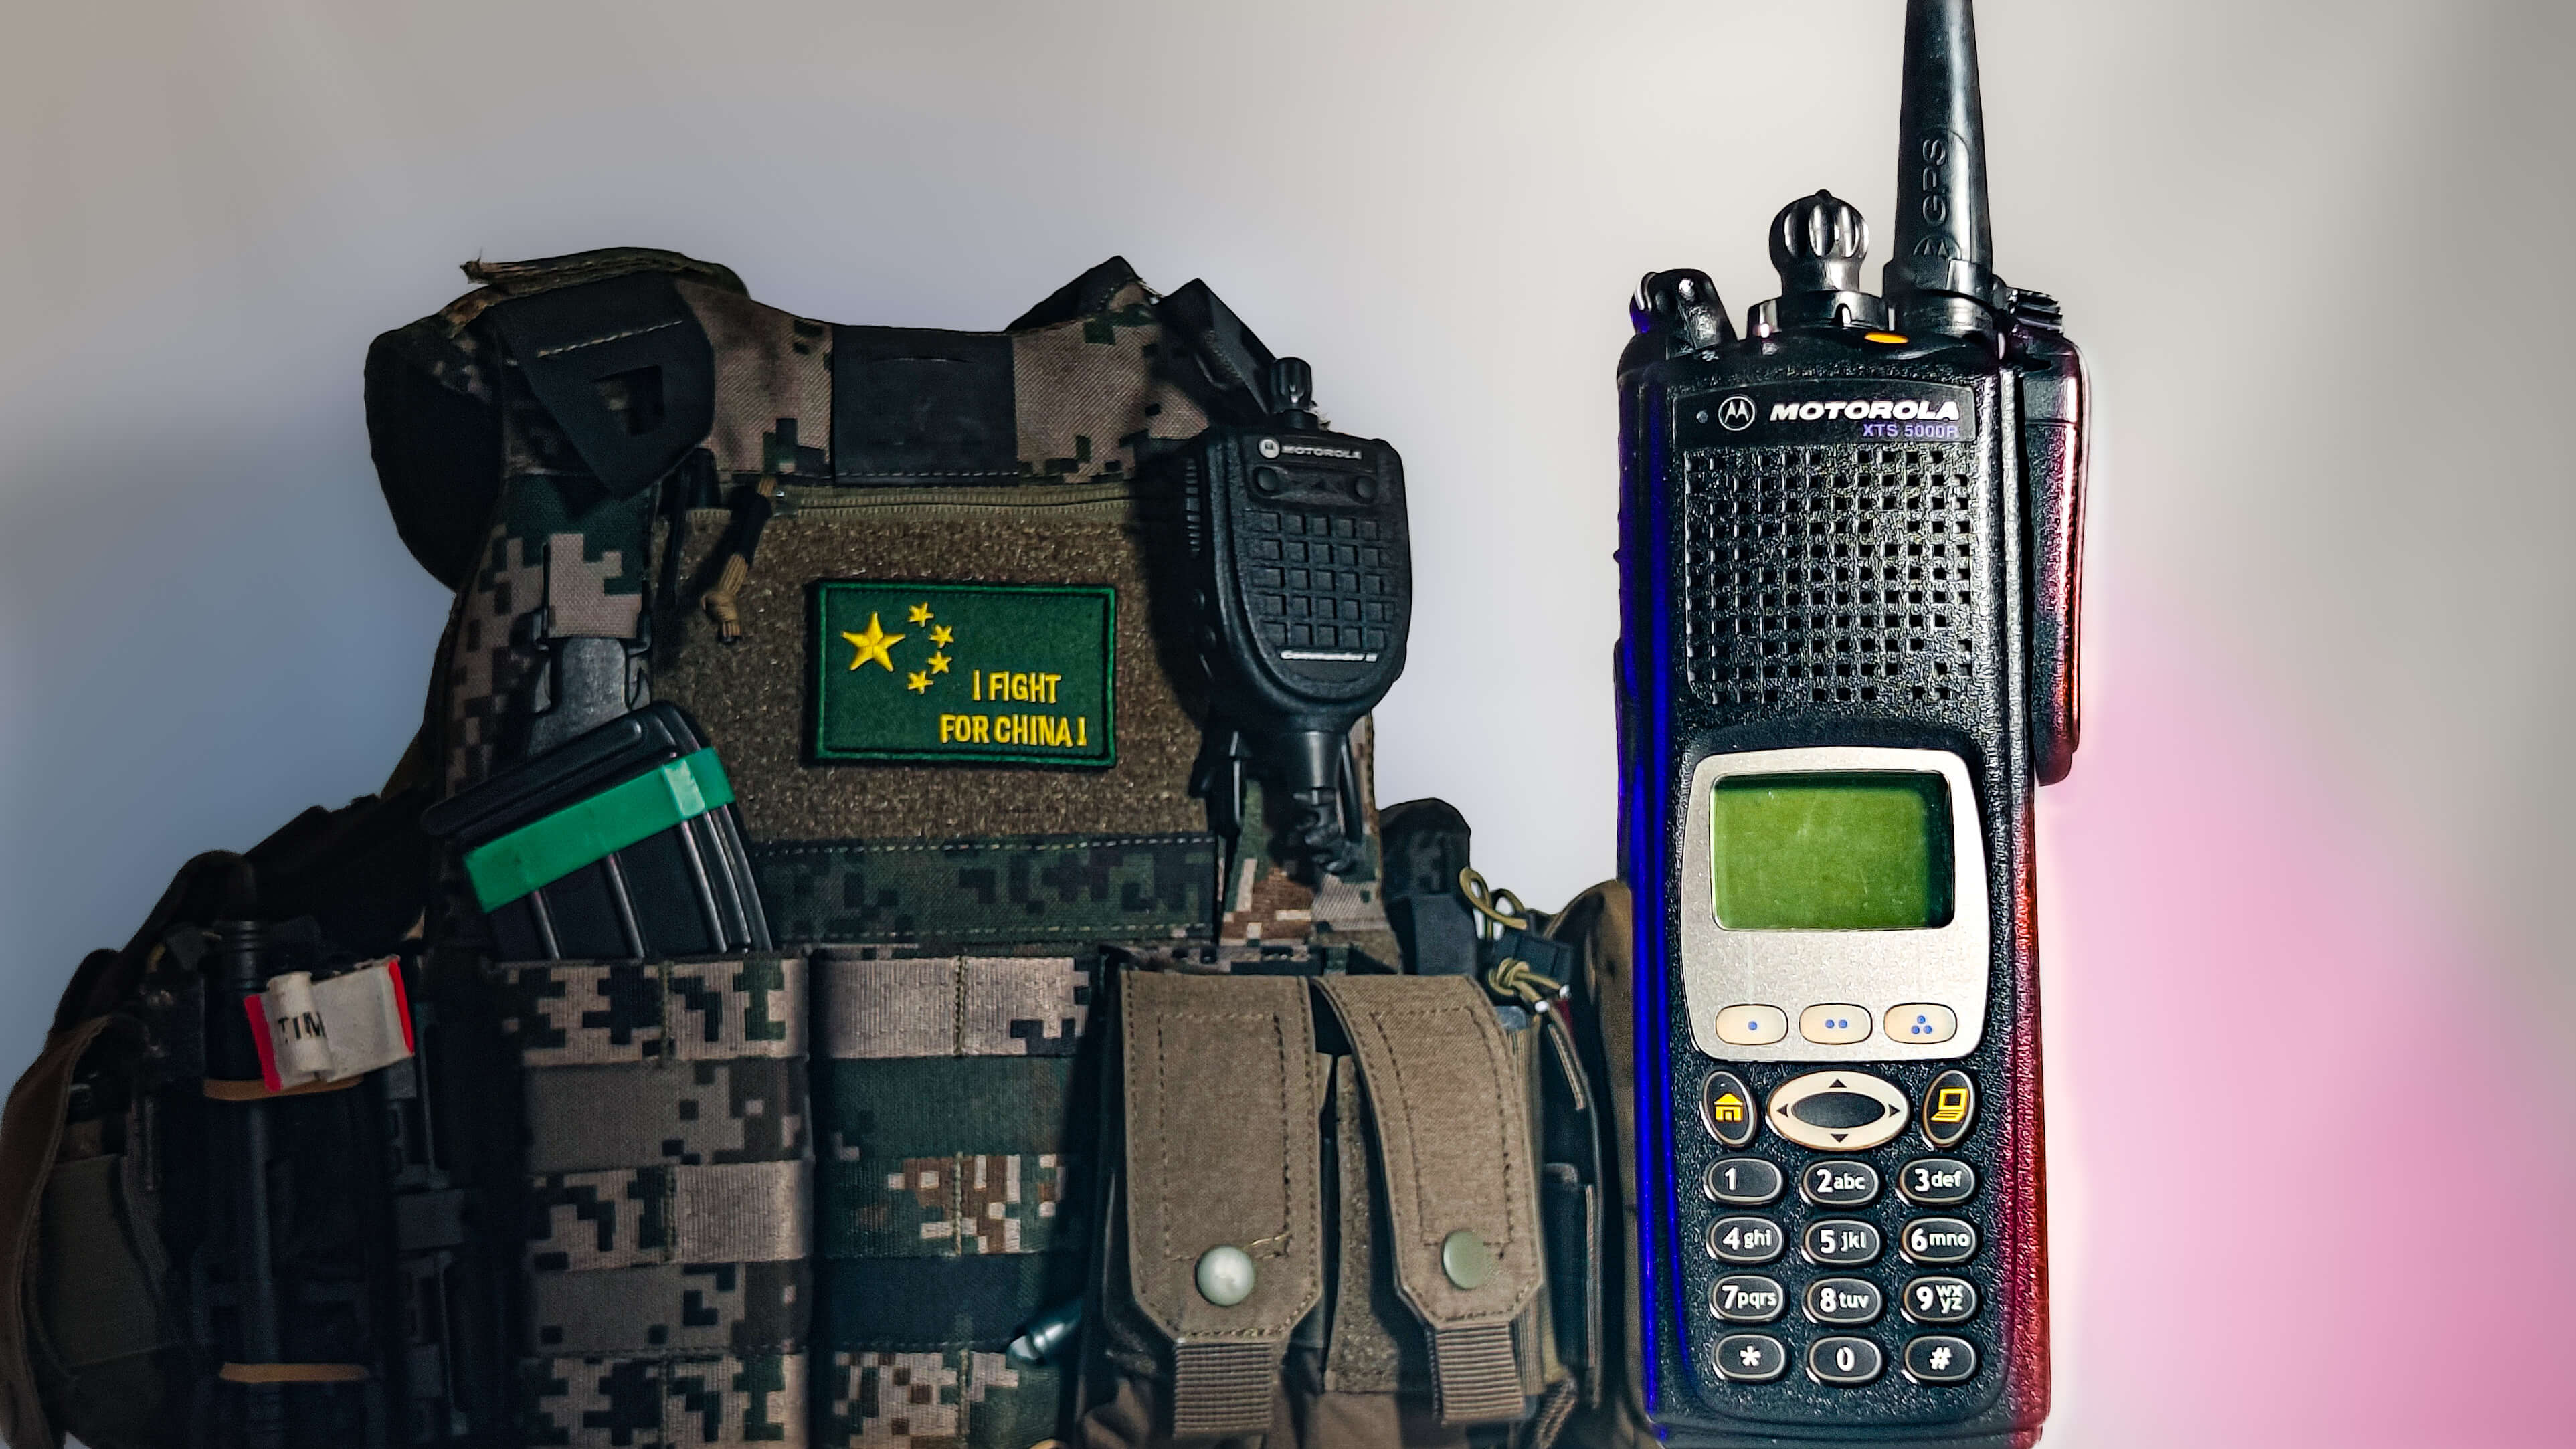
The radio on the right, which I've been using for the past ten or so broadcasts, is also a popular choice among HAM enthusiasts.Nylon guyThis article introduces relevant knowledge and gameplay tips for this device, which falls under the category of "cross-domain hobbies."
This article was originally published in:My blog,using a computer to access the original text provides a more enhanced reading experience.
(This isn't about driving traffic; it's simply about considering the reader's experience.)
<<!-- more -->>
Introduction
This machine may be blinking the indicator light (red) intermittently due to not being part of a cluster, or due to a design flaw. This does not affect its usability.
In this article, I assume that the reader is familiar with computers and can keep up with the pace of the writing, as well as having some basic knowledge of Motorola machines.
If you find any issues or errors in the article, please comment or contact me to make changes.
Machine Overview
The xts 5000 is a classic Motorola radio, and it's the flagship model in the xts series. There are three versions: I, II, and III. The main differences between them are: version I has no screen, version II has a screen, and version III has a screen and a keypad. According to online information, the version III XTS5000 was already the top-of-the-line radio at the time it was released before the Apx series.
| Model | Instructions |
| XTS1500 | No keyboard; equivalent to XTS2500 Model II |
| XTS2500 | The V12 firmware supports 870 channels. |
| XTS3000 | The first portable device in the XTS series, featuring P25 digital functionality. |
| XTS3500 | It's similar to the XTS3000, but it quickly stopped being sold due to some issues. |
| XTS4000 | Designed for covert or undercover operations, it's small, flip-open, with dual displays and a compact antenna. |
| XTS5000 | Flagship device, available in I, II, and III types, with a large display screen, P25 digital mode, supports clustering, more switches, and improved RF performance. |
Reference:radioreference.com
Meaning of XTS5000 type number:
The type number can be obtained through three methods:
- Label on the back of the machine
- Immediately after turning on the device, press and hold both of the side function buttons five times in quick succession.
- Retrieve the codeplug after reading it in the frequency software.
For example:H18QDH9PW7AN
| Symbol | Meaning |
| H | Handheld |
| 18 | XTS5000 |
| U | Frequency bands (commonly K = VHF, Q = low UHF, S = high UHF, U = 700/800) |
| C | Power level |
| F | Physical packaging (C = Model I, F = Model II, H = Model III) |
| 9PW7AN | It seems that all III types end with this. |
Reference:batlabs.com
However, the machine code on my machine seems to be different, and the label on the rear panel indicates that it is a Type I machine.(H19QDC9PW5AN)Actually, it's a Type III, and turning it on five times also displays Type III. However, it doesn't cause any problems, and the price was very attractive, so I bought it anyway.
Previously, I mentioned that this machine was located in the crossover area between HAM and old-fashioned hobbyists, primarily because:
- This is a radio (obviously), and both have a need for it.
- Explosion-proof radio, robust design, tactical appearance, and stylish.
- With MDC1200 messages and TPT (talk permit tone), it's really satisfying to use.
Appearance introduction

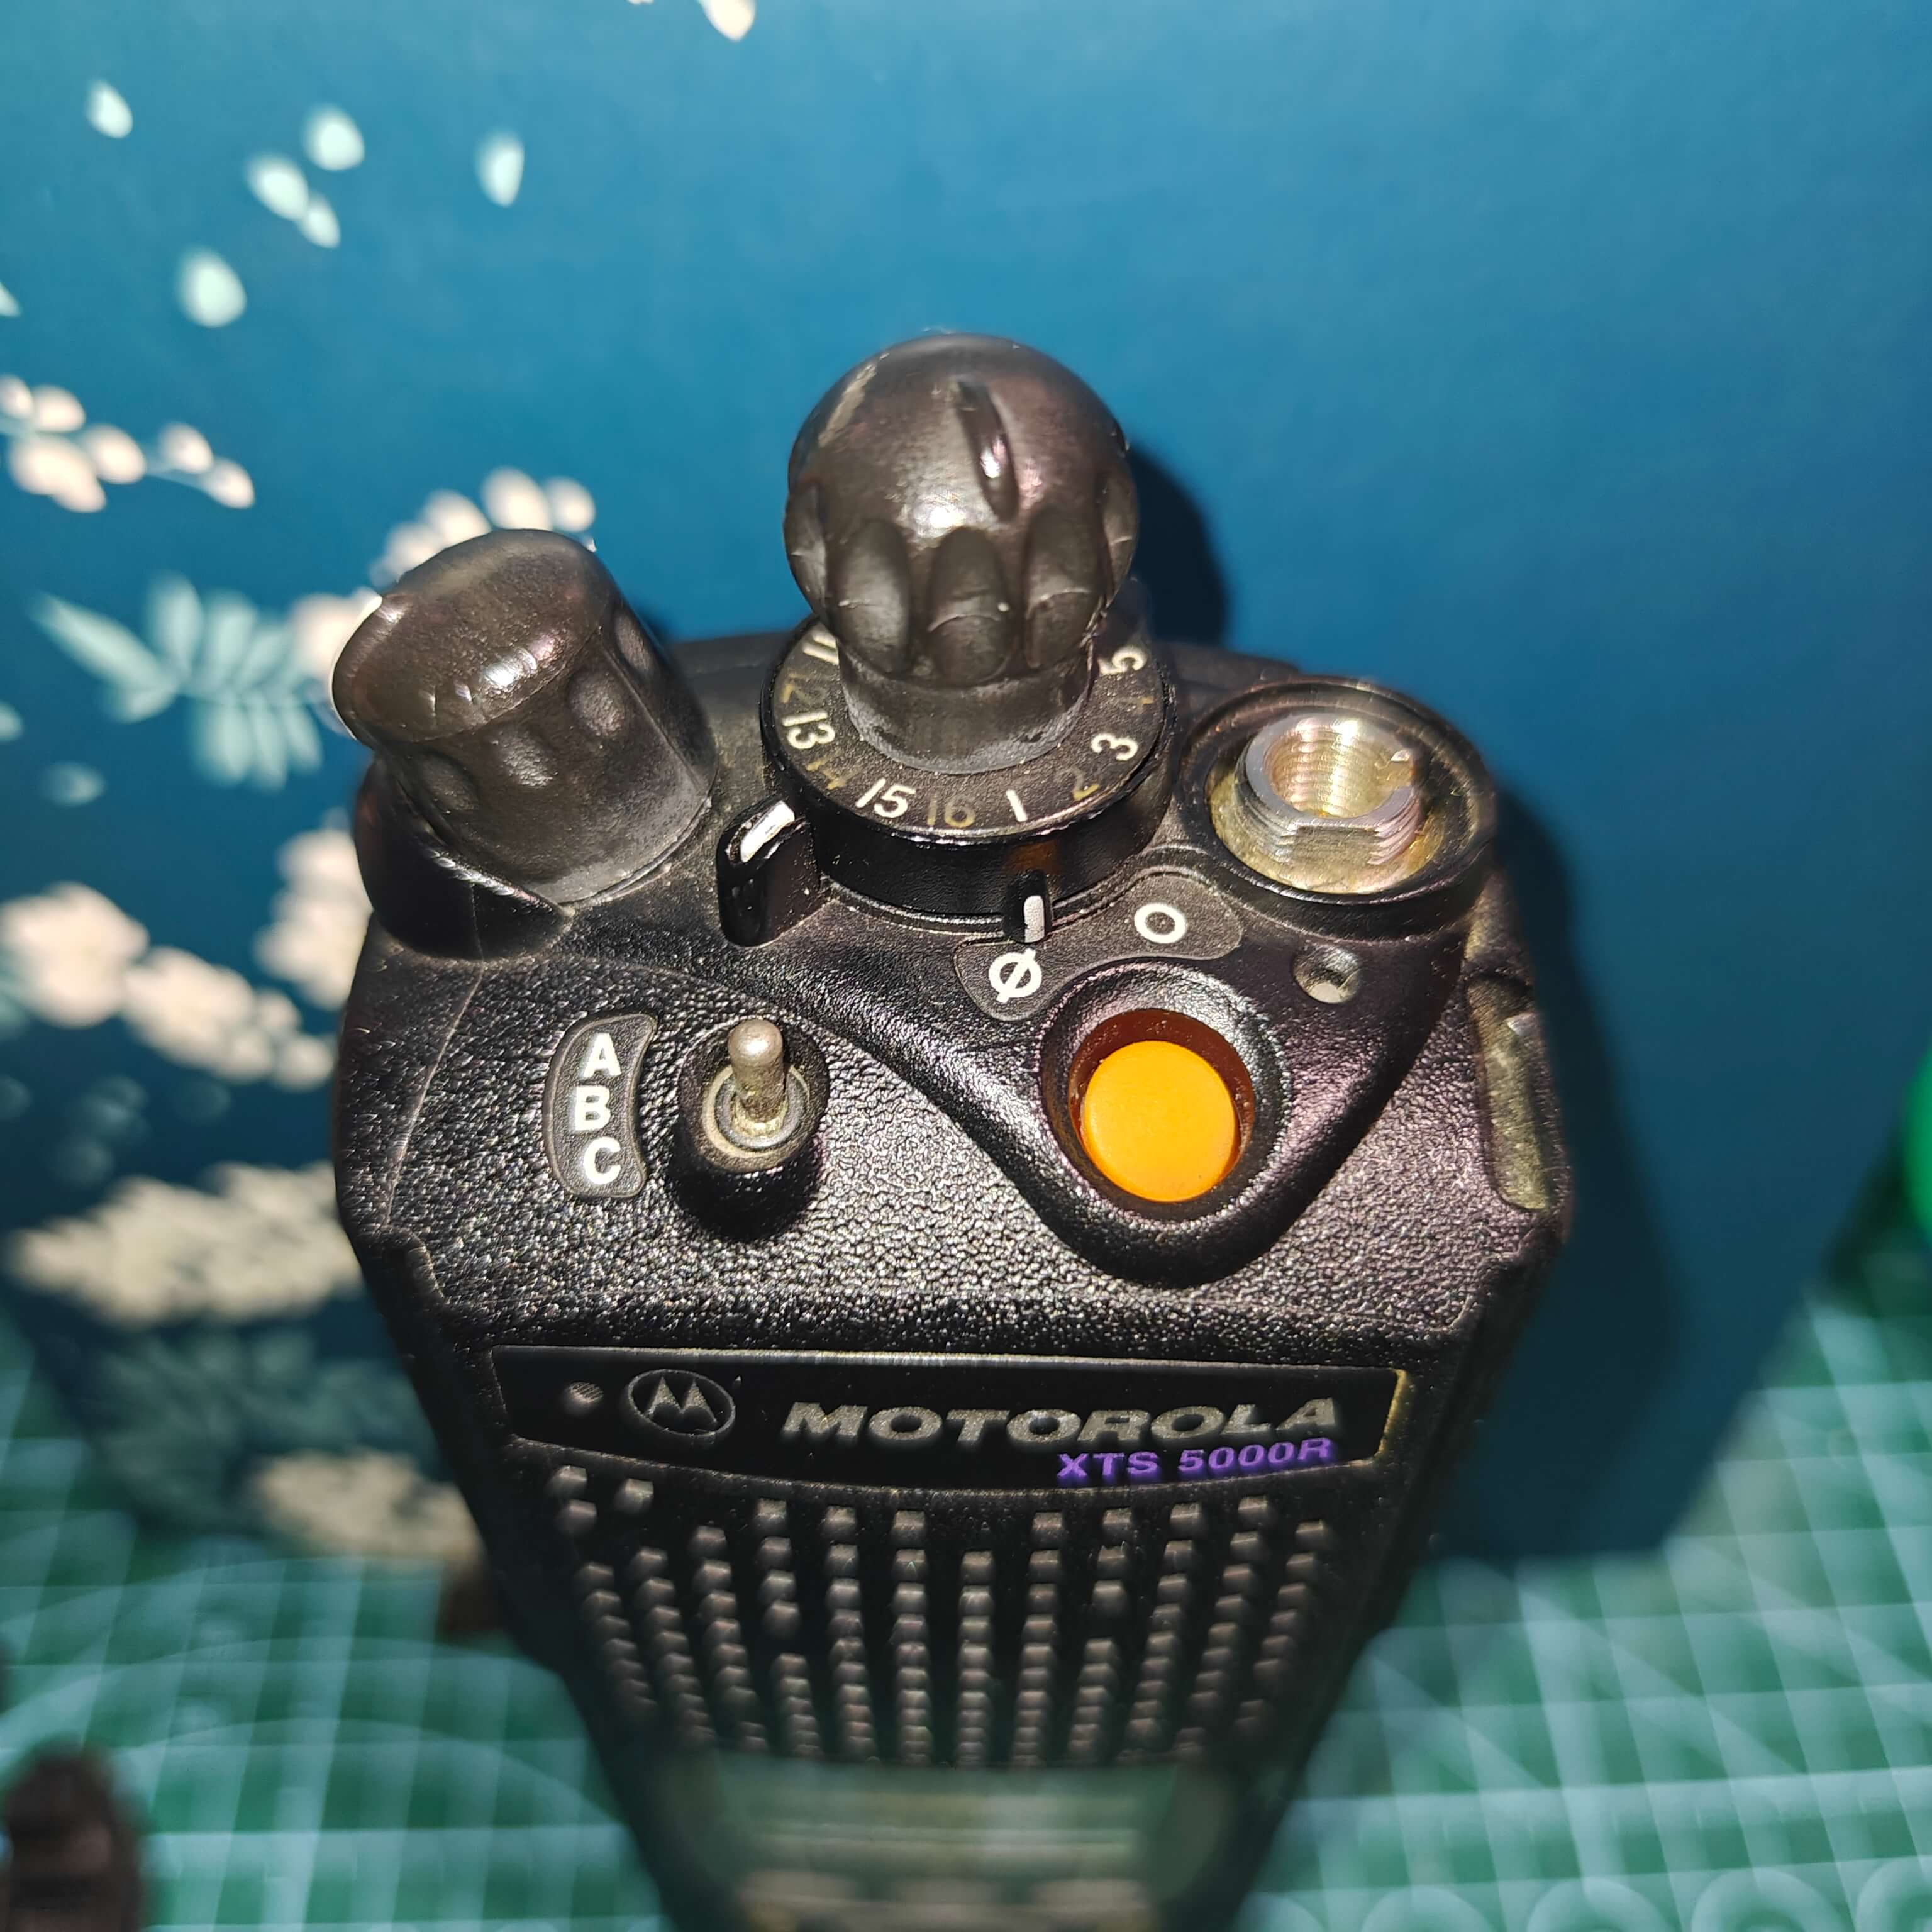
From a visual perspective, it features two knobs on top: one for power/volume control and channel selection (which can be changed to regional selection), and another with two and three rotary switches.(ABC), a top key, with an antenna interface. I'm not sure what to call this antenna port based on its scientific name, but SMA antennas can also be used. Both the key and the switch can be customized with different functions. The function I have defined is:
| Parts | Feature Description |
| 15 knobs | Channel switching |
| Double-pole switch | Ø No function, 0 keyboard lock |
| Three-position switch | A: Scanning function
B: No function
C: Low-power transmission |
| Top key | Offline (Direct) |
Here, I'll explain what "disconnect from repeater" means. When you disconnect from the repeater area, you can directly ignore the frequency offset and switch to using the downlink frequency for transmission and reception. If one of your channels uses the same frequency for transmission and reception, or if a channel with different frequencies is enabled, the screen will display the "Disconnect" icon: |→|

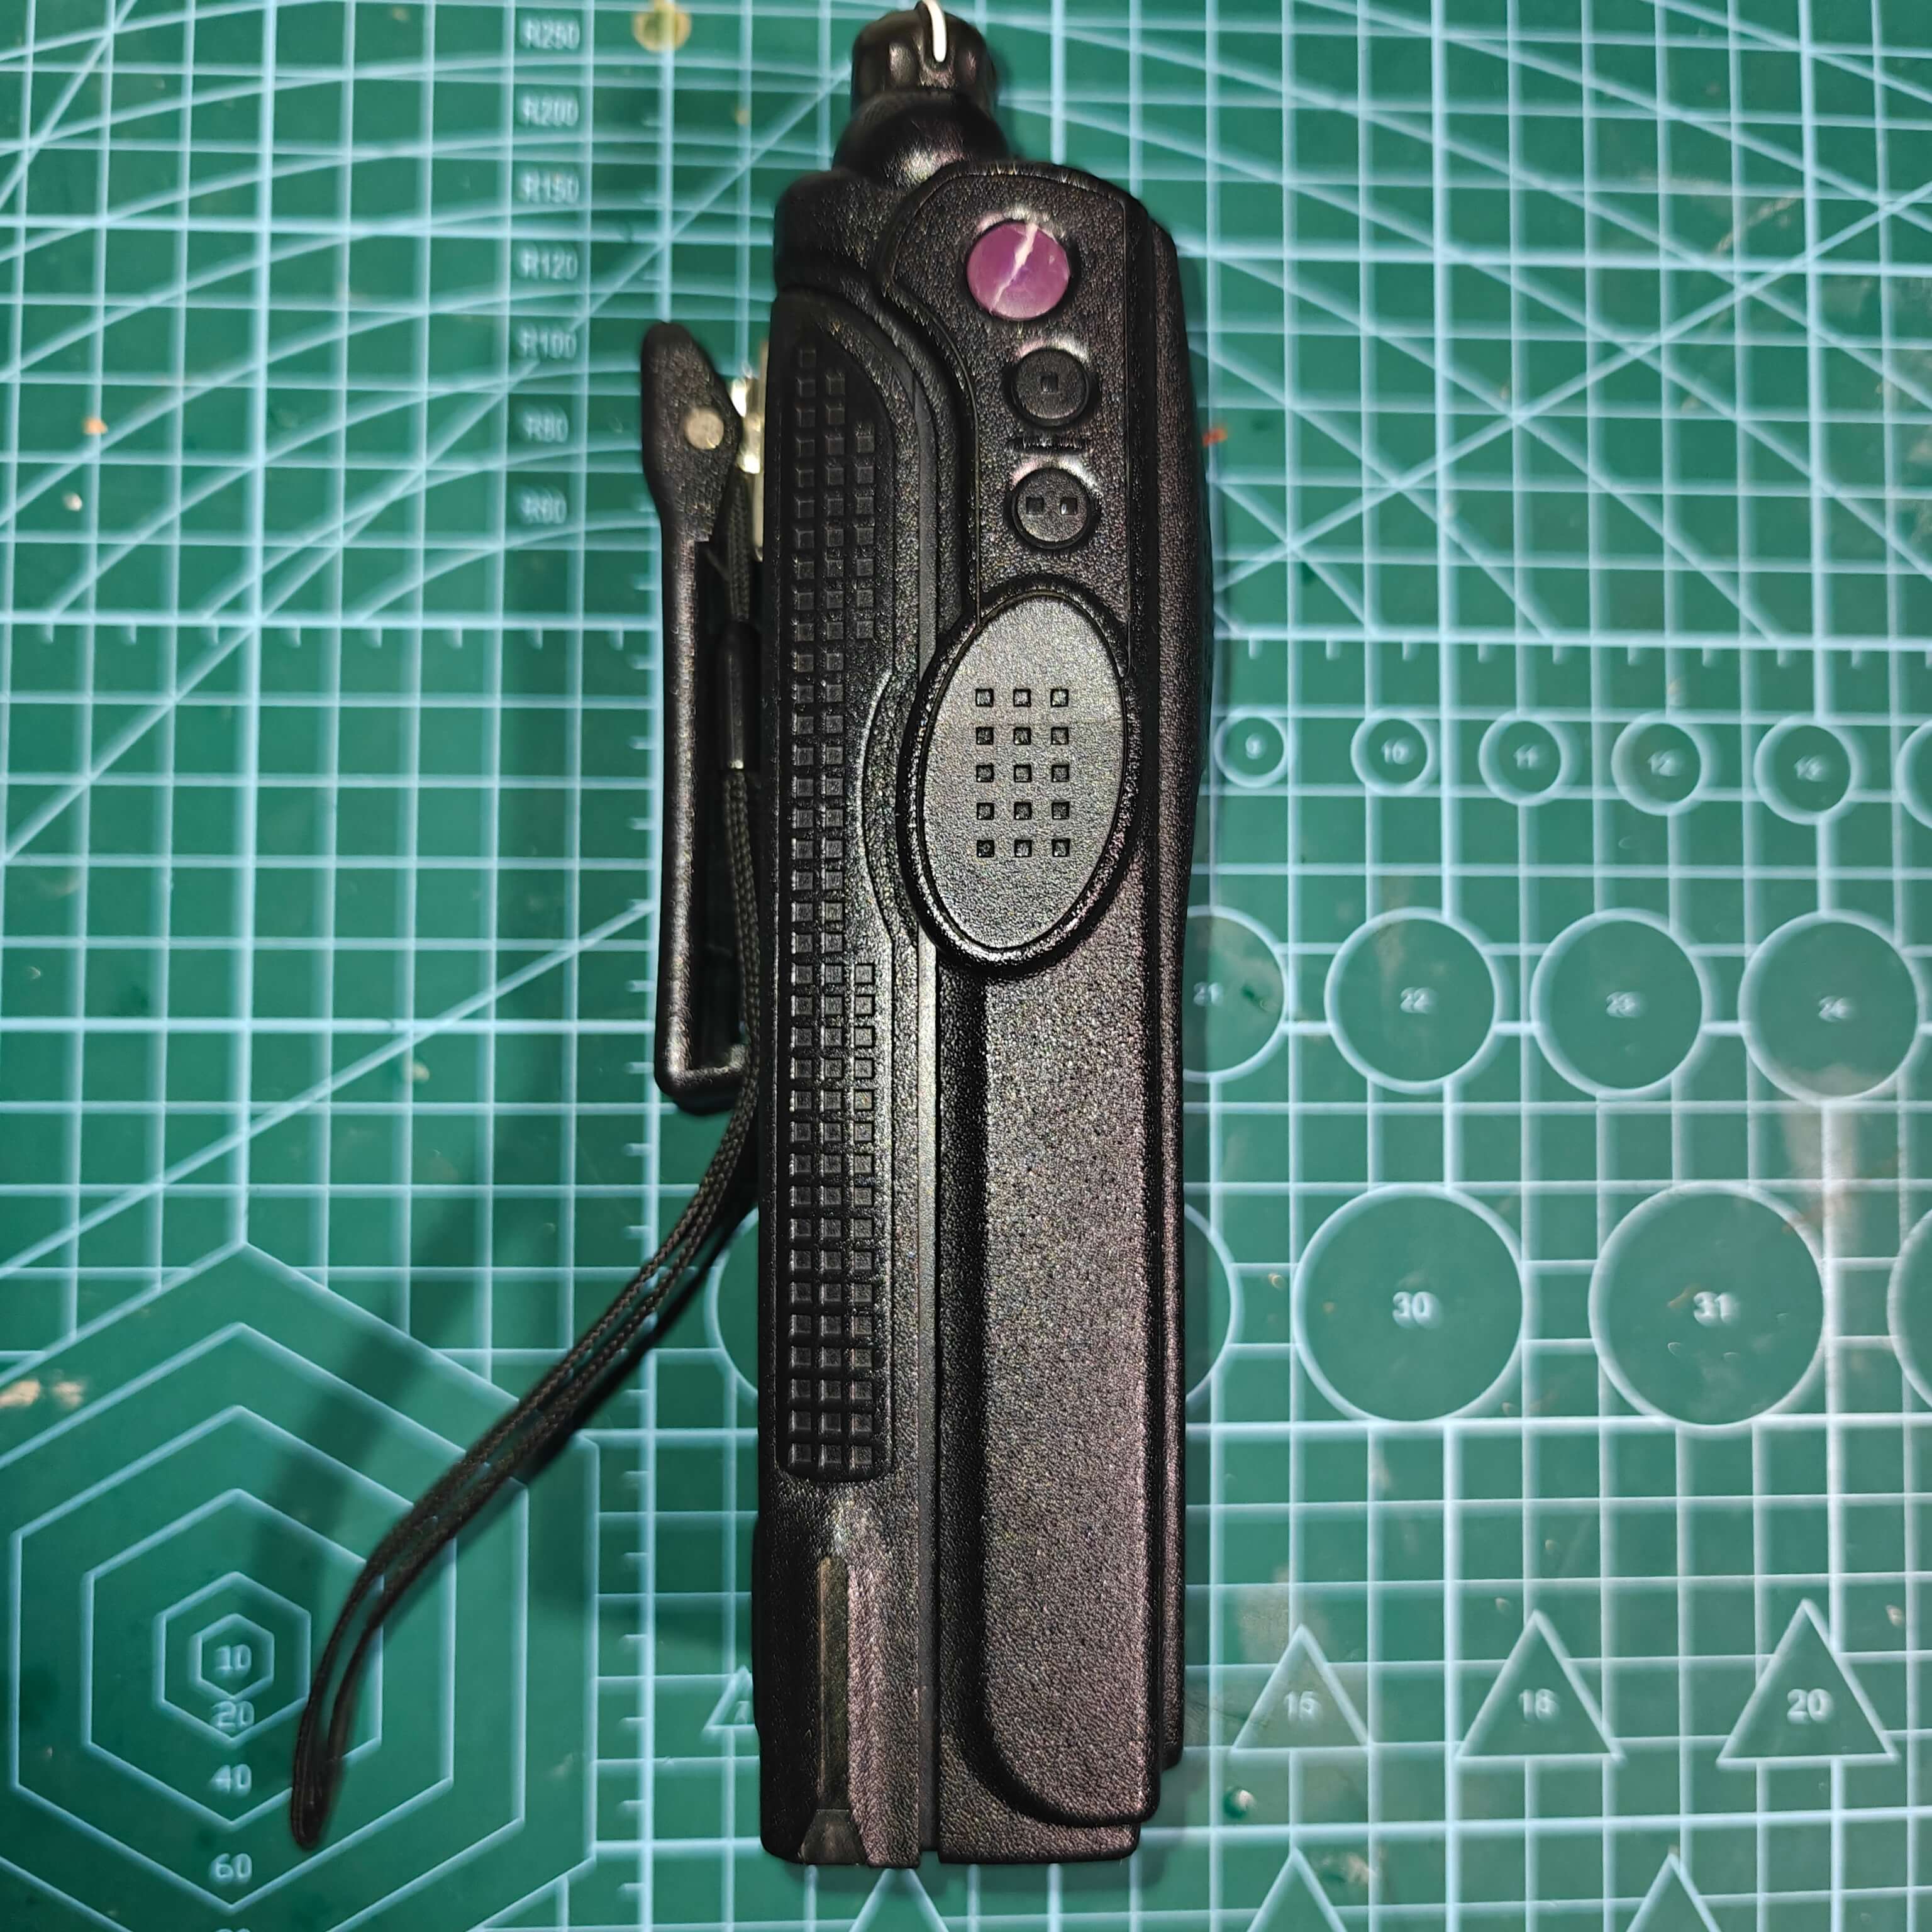
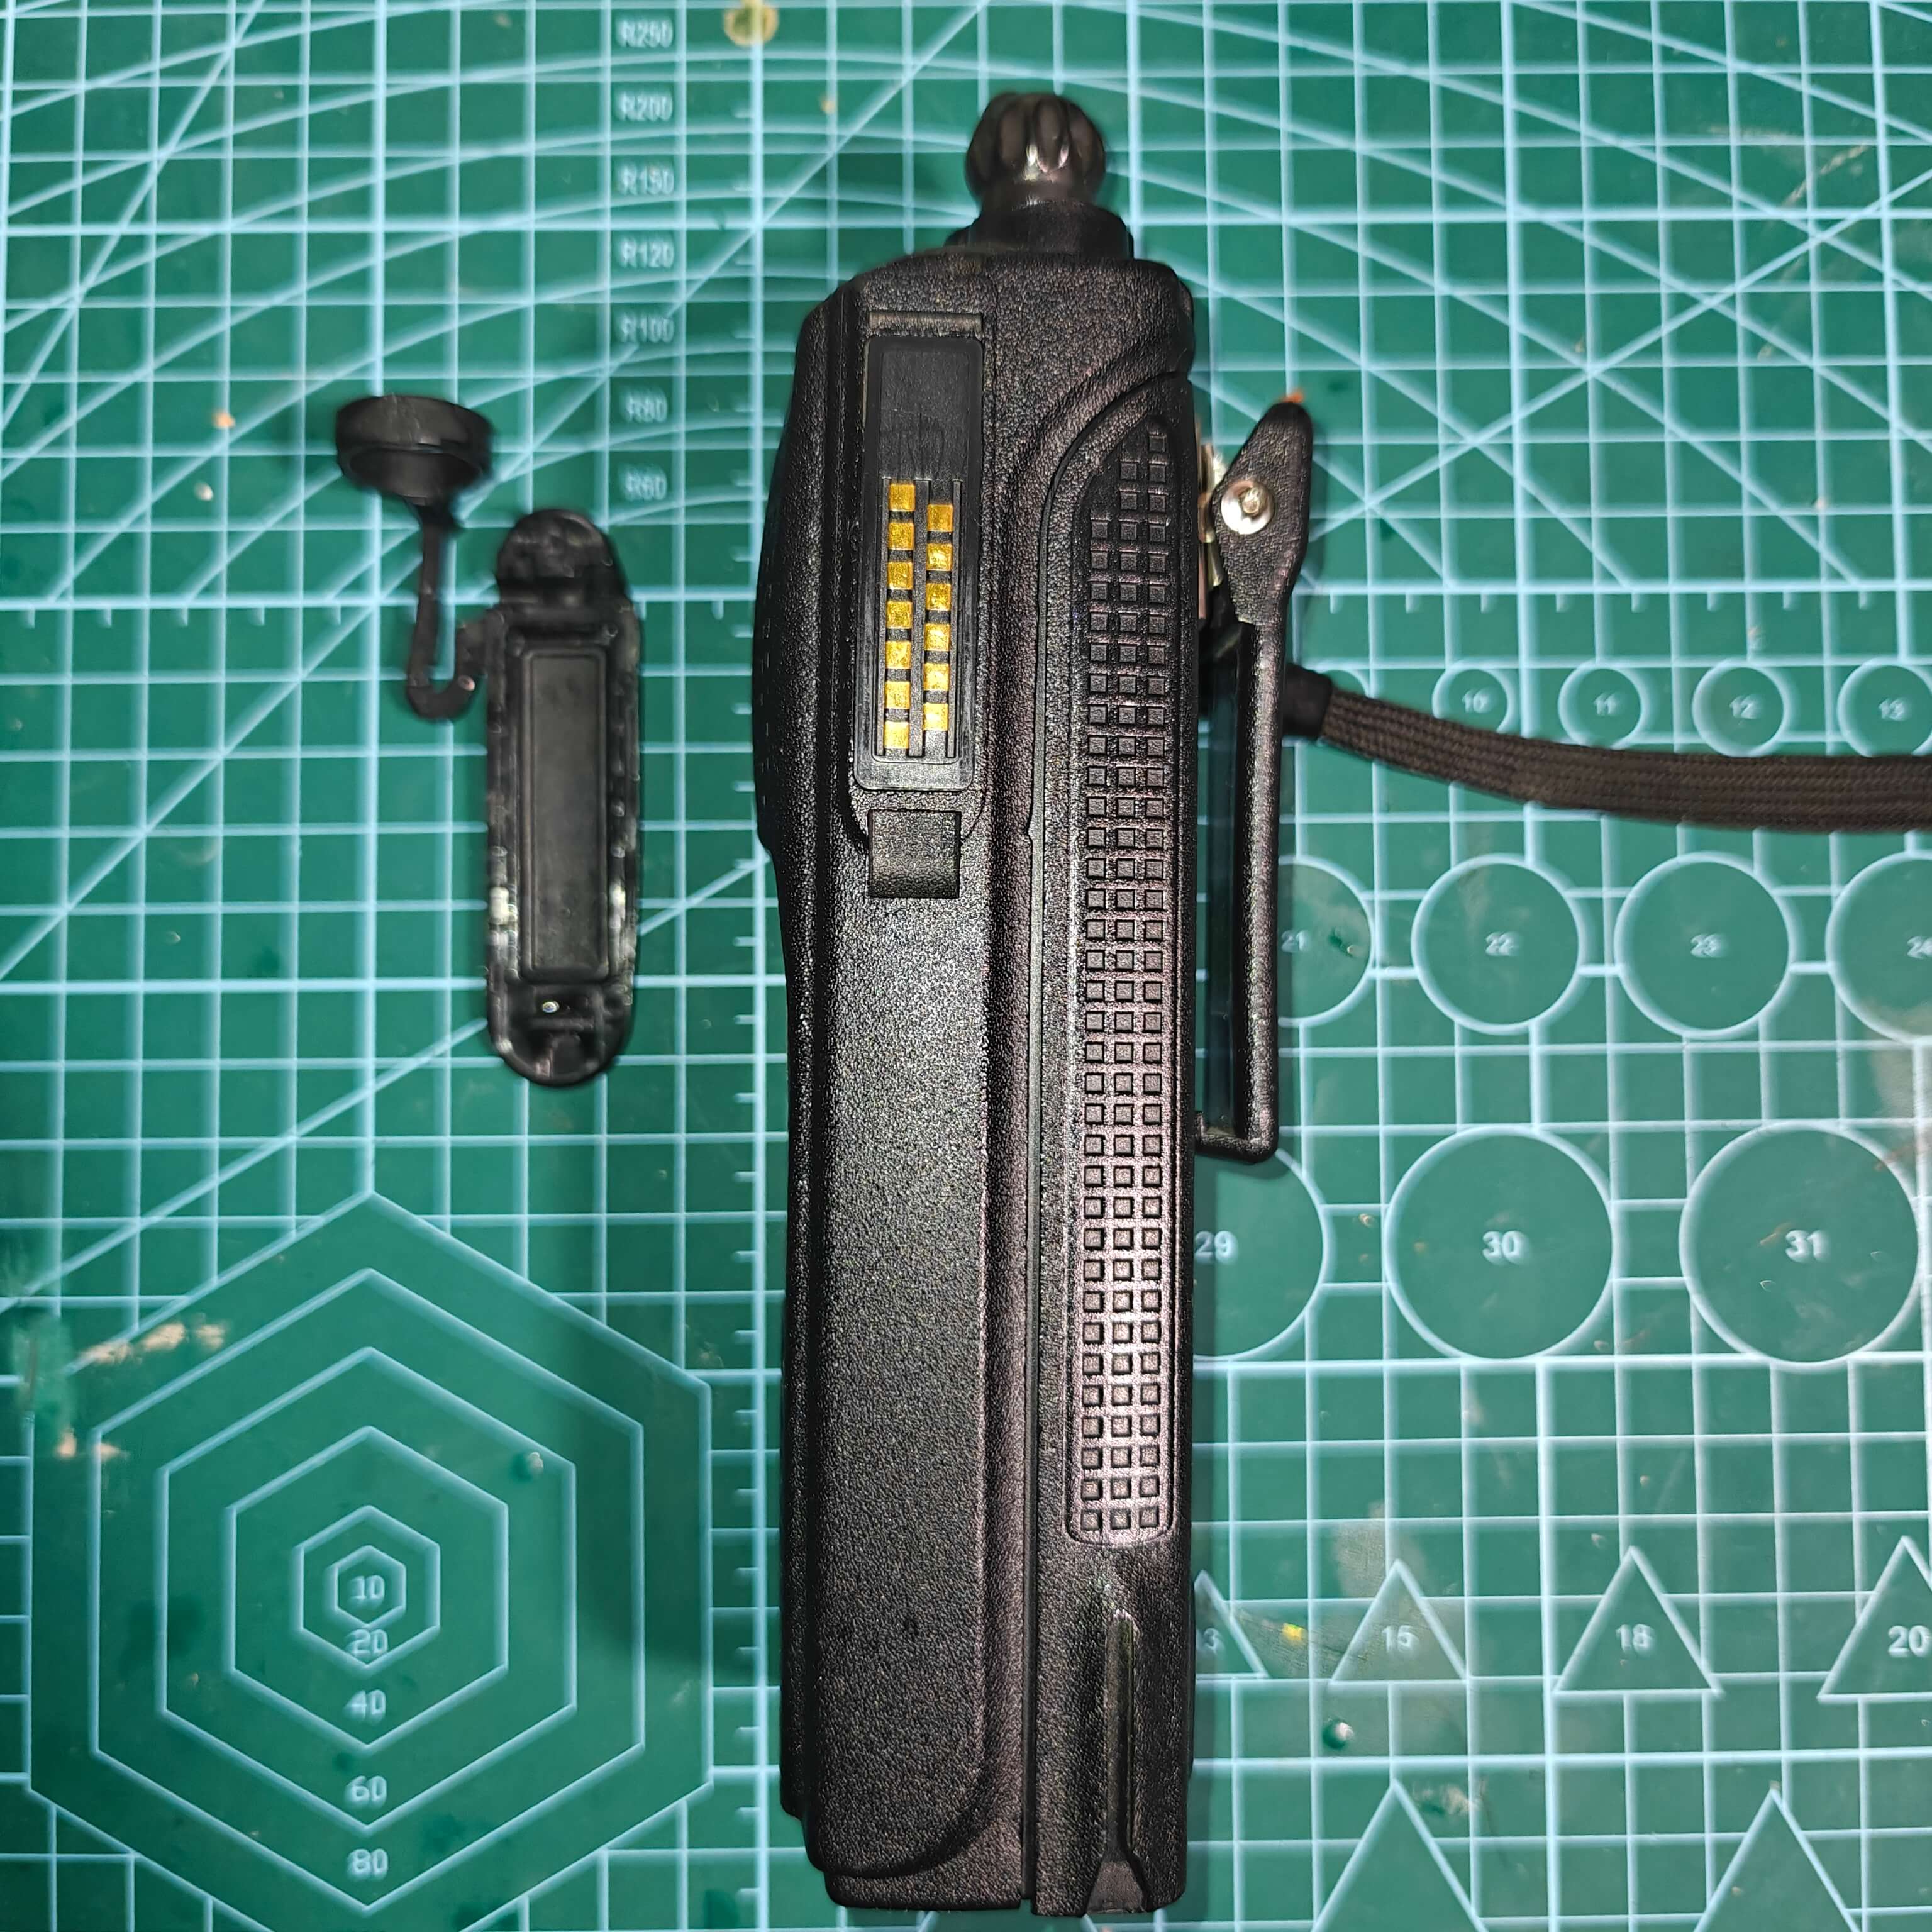
Looking at the side, from top to bottom, you'll find the function keys, function key 1, function key 2, and PTT. The other side contains the data ports for connecting the PTT, microphone, and frequency line. When the data interface is not in use, it can be covered with a dust cover (the black object on the left side of the image). The keys can be customized to perform different functions. I have defined the following functions:
| Function keys | Feature Description |
| Side keys | Disable noise cancellation |
| Feature 1 | Regional + |
| Feature 2 | Regional- |

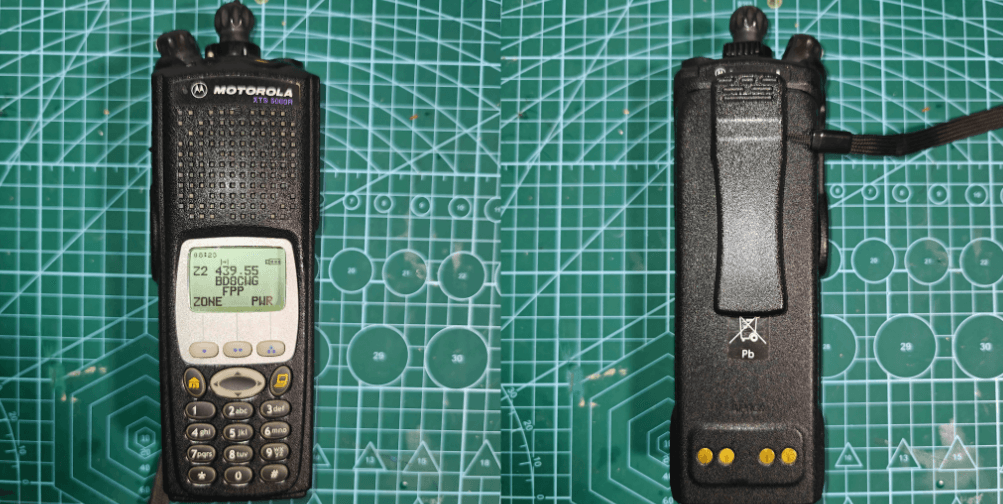
The front side features a screen, with three buttons (•)(••)(∴) located below, corresponding to three on-screen menus. The bottom has navigation keys, followed by a number and letter keyboard. The back side has a battery with a clip.

Write a description
Thank you here.BH5HQQThank you for your help during my exploration of writing frequency software. Please refer to the software and firmware.Related attachments。
Firmware and software
In the attachment, we can see "ASTRO 25 Portable". Depot "R20" and "ASTRO 25 Portable" CPS "R20", the differences between them are:
- The depot can be used to write firmware and enable functions.
- As enthusiasts of CPS (Continuous Phase Shift) radios know, they are typically used for simple frequency modulation (FM).
Now, Type-C data cables are available. If you have a serial port data cable but no older computer, you can buy a serial to USB adapter for a few dollars (remember to ask the store for the driver). I am in the second situation; I bought a converter for over 3 yuan with free shipping, and after receiving it, I just installed the driver.
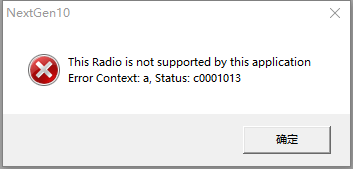
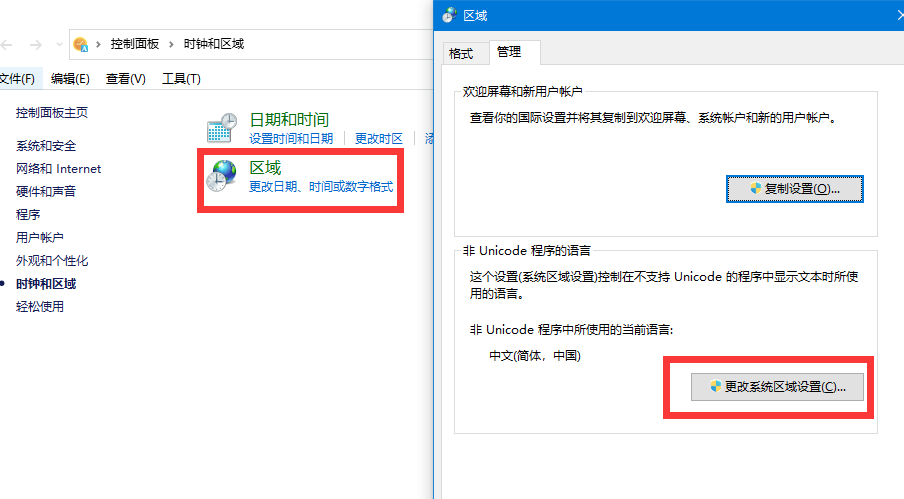
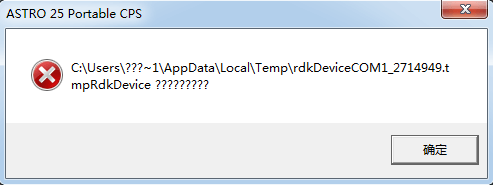
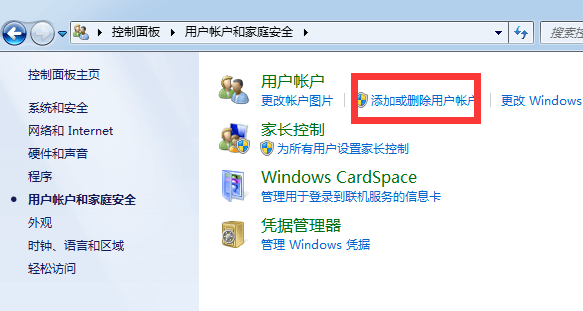
Regarding the issue of which version of software to use, intuitively, it should be backward-compatible. There is also the statement that "older firmware uses older software." However, since I received the machine with the latest firmware.(R20)Therefore, it is impossible to verify this statement. Moving forward, I will use R20 as an example. The software has been tested and can run on Windows 10. The screenshots in this article may show a mix of Windows 10 and Windows 7, but this does not affect the clarity of the explanation. If you encounter errors when reading the machine, please refer to:
| Problem Description | Error/Warning | Solution |
| Non-Unicode programming languages are not in English. | This radio is not supported by this application. <break>Error Context: a, Status: c0001013 | Convert non-Unicode programming languages to English (US). |
| The computer user's name is in Chinese. | C:\\Users\\???1\\AppData\\Local\\Temp\\rdkDeviceCom1_2833340<break>.tmpRdkDevice | Create a new computer account with a username that is not in Chinese. |


<br>


Enable functionality
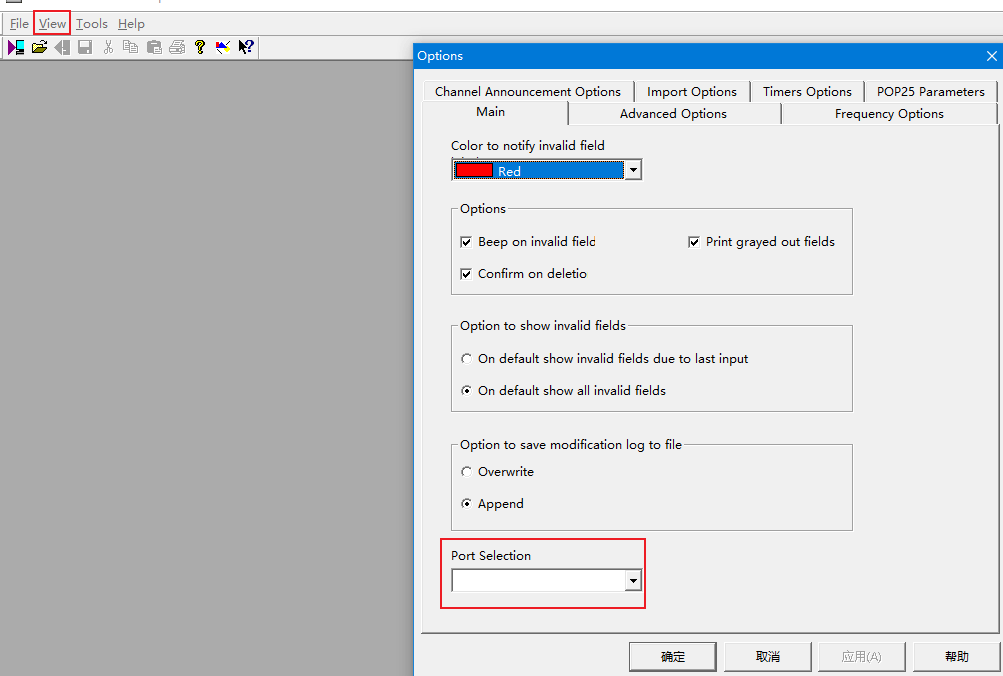
Connect the radio to the computer using a coaxial cable, then turn it on.DepotSoftware, clickView, inMainBelowPort SelectionYou can choose a port (although this step is optional, as you will likely be prompted to select a port when you attempt to read or write data, or the default port may already be selected).

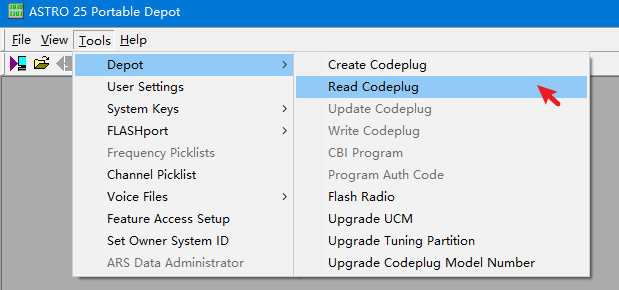
Click sequentiallyTools → Depot → Read the code plug You can read the current firmware of the radio and then click the "Save" icon to select a folder, which will save the initial firmware of your radio. If you encounter problems later, you can try flashing this original firmware package again. (Based on my years of experience with phone flashing, I believe that's how it works in theory. However, I haven't tried it myself. According to online resources, if flashing fails, you can re-flash it, so it should be relatively reliable.)

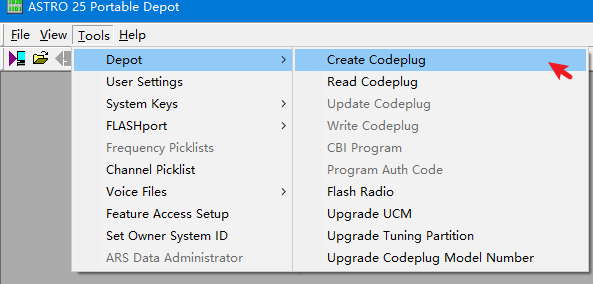
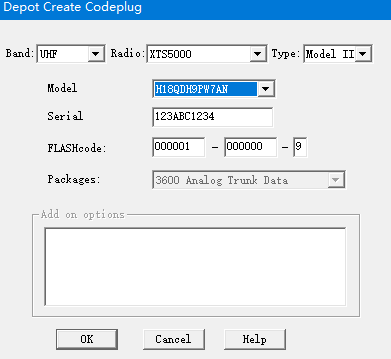
After saving, close this firmware by clicking on the following steps in order:Tools → Depot → Create a codeplugCreate the firmware for the features we want to enable, and in the pop-up window, first select the third "Several generations of equipment (type)", then select the corresponding radio."Frequency band、Model, here I amUHF、XTS5000、Model IIIThe Model and Serial numbers can be ignored, but the Serial number must also be changed accordingly, ensuring that the number of digits and letters matches what the software specifies.


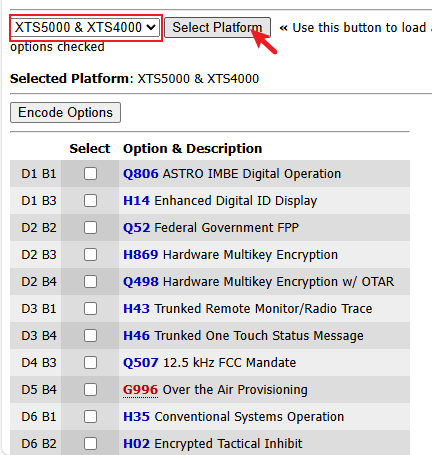
The most important thing is the FLASHcode, which determines what features you will enable. You can now visit the website.Flashcode Encoder, in the dropdown box on the page, select your device model. I have selected here.XTS5000&XTS4000, clickchoose platformButton, a message will be displayed below the webpage that says:Check boxSelect the features you need to enable from the table (you can use the web translation feature to view the functionality).Do not choose Q507, H04, Q352Do not select all of the remaining options, as information suggests that the functions of cluster and FPP may conflict. After selecting your desired options, click on the top or bottom of the page.Encoding options, the FLASH code will then be displayed.

The FLASH code I generated at that time was:5A908A-B01F87-5, this code isNot selected H869, Q507, H35, H37, H04, Q352, Q241The result can be used directly by readers who don't want to put in too much effort.
ClickOK, just wait a few seconds to generate the firmware with the selected functions enabled. You can then adjust the settings and flash it again, or you can directly flash it now. I will proceed with flashing it directly.Features enabled。
Advanced settings
- For advanced settings, I won't cover all the details for a single setting item at once; instead, I will explain them based on specific functional requirements.
Call sign display
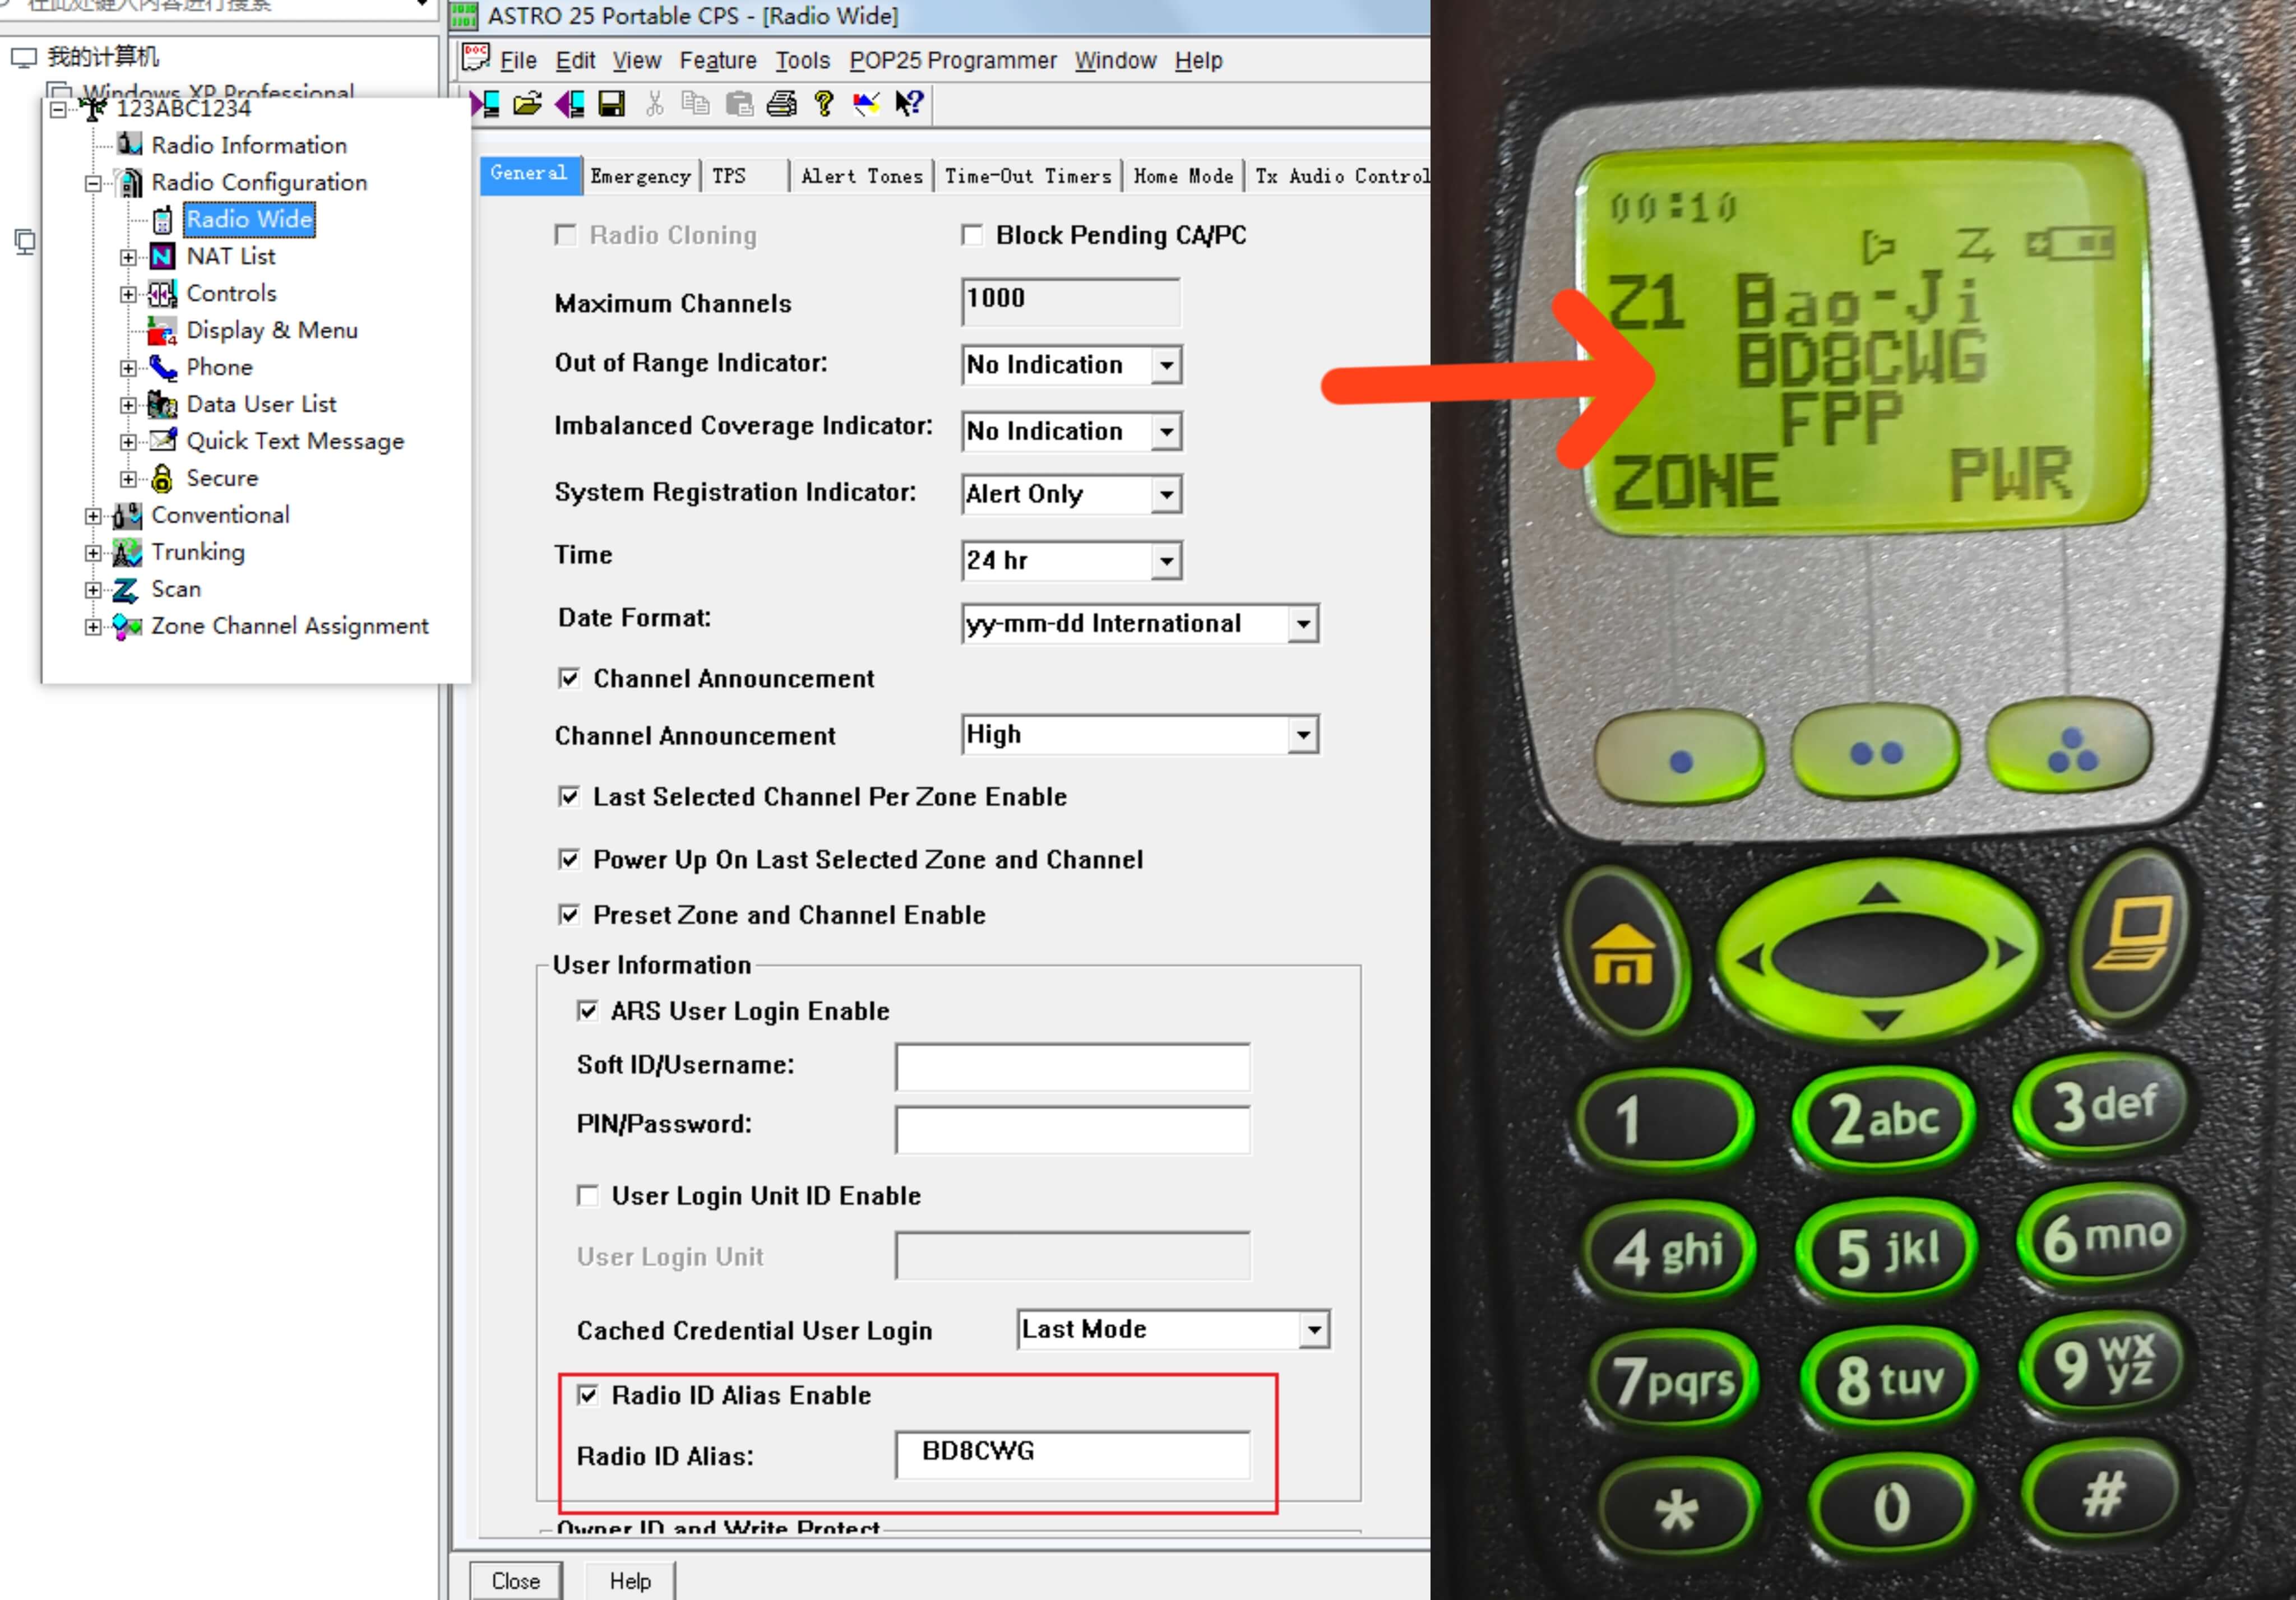
As shown in the figure, simply enter the call sign at the location marked with a red box. Entering directly will align to the left; adding 2-3 spaces will achieve the centered effect shown in the image.

Radio menu item
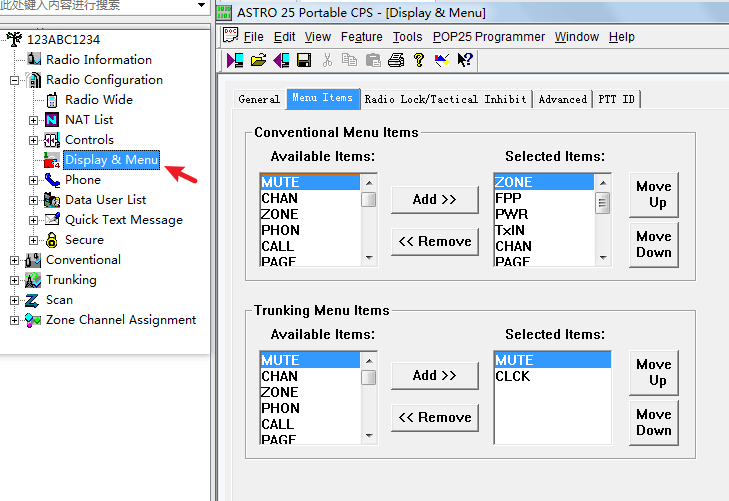
After enabling the feature and adding it, you might find that the menu still only has a few options. In this case, you need to add menu items, as shown in the example, by simply adding the desired content to the right side and clicking. MoveUP And MoveDownThe order can be adjusted up or down. Note that this menu option, Trunking, is used when connecting to a cluster. We probably won't need it, so we will ignore any further mentions of Trunking.

Some known menu functions
| Function indicators | Feature Description |
| ZONE | Region |
| CHAN | Channel |
| FPP | Front panel programming (manual frequency) |
| PWR | Power adjustment (high/low) |
| TxIN | Launch prohibited |
| CLCK | Time setting |
| BATT | Battery information |
| PAGE | Specified search and rescue ID |
| PROG | Edit menu (includes phone book PHON, call list CALL)<break>Search list PAGE, scan list (SCAN) |
| TMS | SMS |
| MYID | Display this device's ID |
| USER | Log in to the network |
| VMUT | Turn off sound (but keep notification sounds on) |
| LOC | Location |
Enable the frog-like signaling.
You can listen to the audio version of the original article here:mdc1200
Or click:Audio link
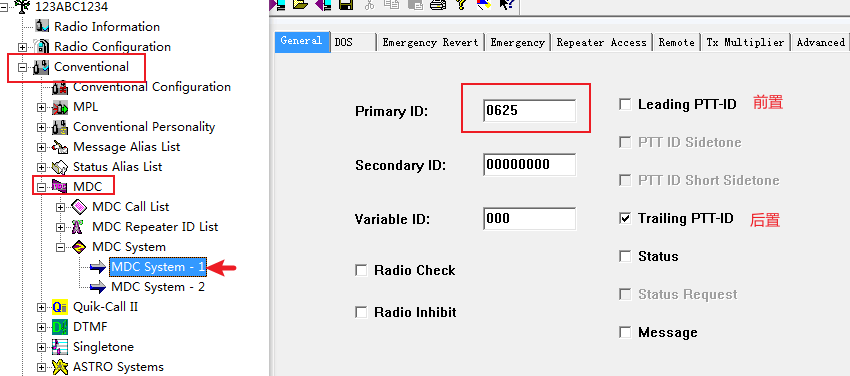
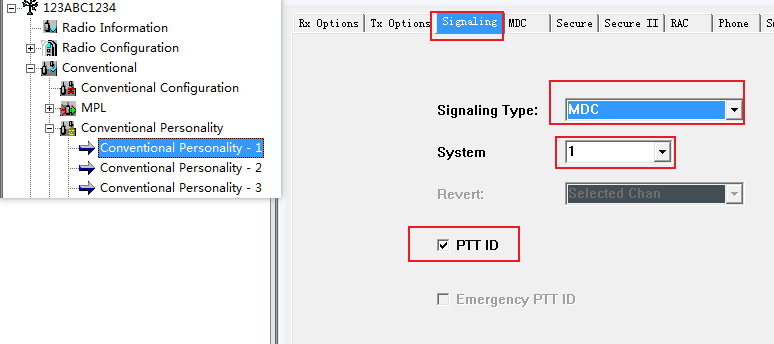
Motorola's "croak" signaling, specifically the MDC1200 signal, must first be configured within the MDC System.ID, choose the signaling methodFront, rear

Re-enter the channel you want to transmit on, and select.SignalingOption card, selectMDC, choose yourMDC system number, check the boxPTT-ID

Enable TPT
TPT (Talk Permit Tone) refers to the notification tone that indicates when a call is permitted. You can only start speaking after hearing this tone. In non-cluster environments, it has no practical effect and is generally not recommended to be enabled, as it can cause some inconvenience. However, I personally like this sound, so I have enabled it in my Z2 zone.
You can listen to the audio version of the original article here:TPT
Or click:Audio link
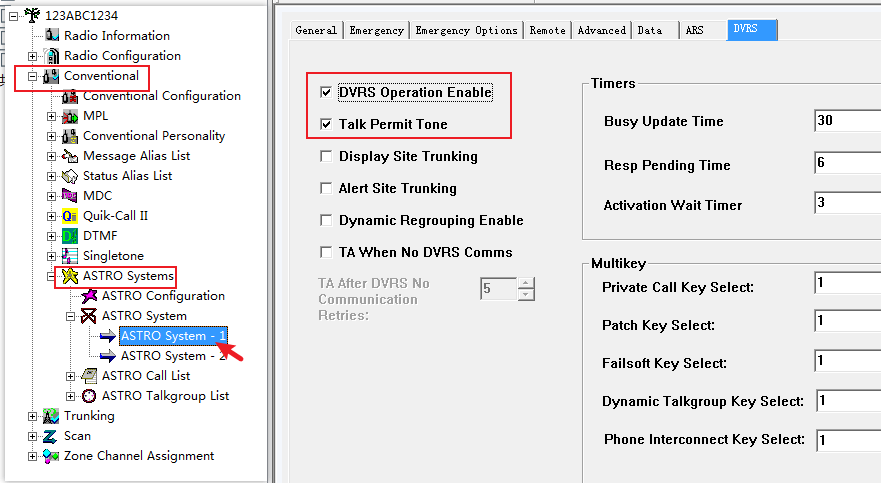
First, enterASTRO System Open DVRS and check the boxTalk Permit ToneIf other settings display an error message in red at this time, simply disable the corresponding option.

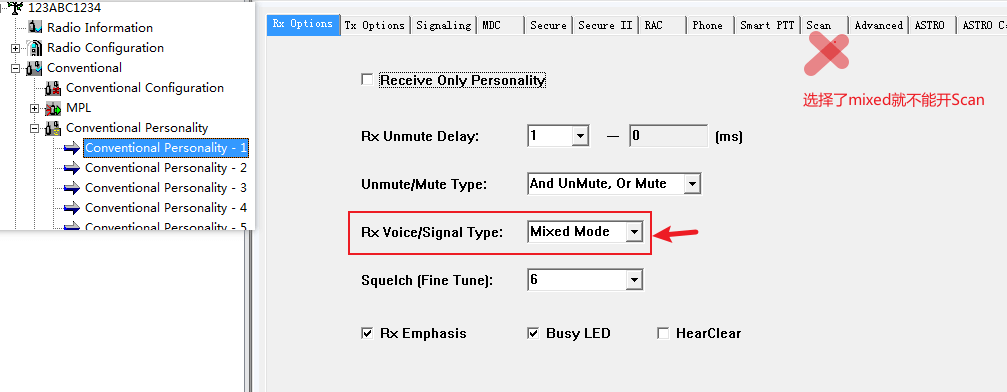
Immediately proceed to the channel you want to use to access this functionality. In Available prescription medications In the middle, we willRx Voice/Signal TypeChoose to Mixed modePlease note that opening this willScanError: If the Scan displays an error (red), then stop the Scan.

As I mentioned earlier, enabling TPT will present some challenges:
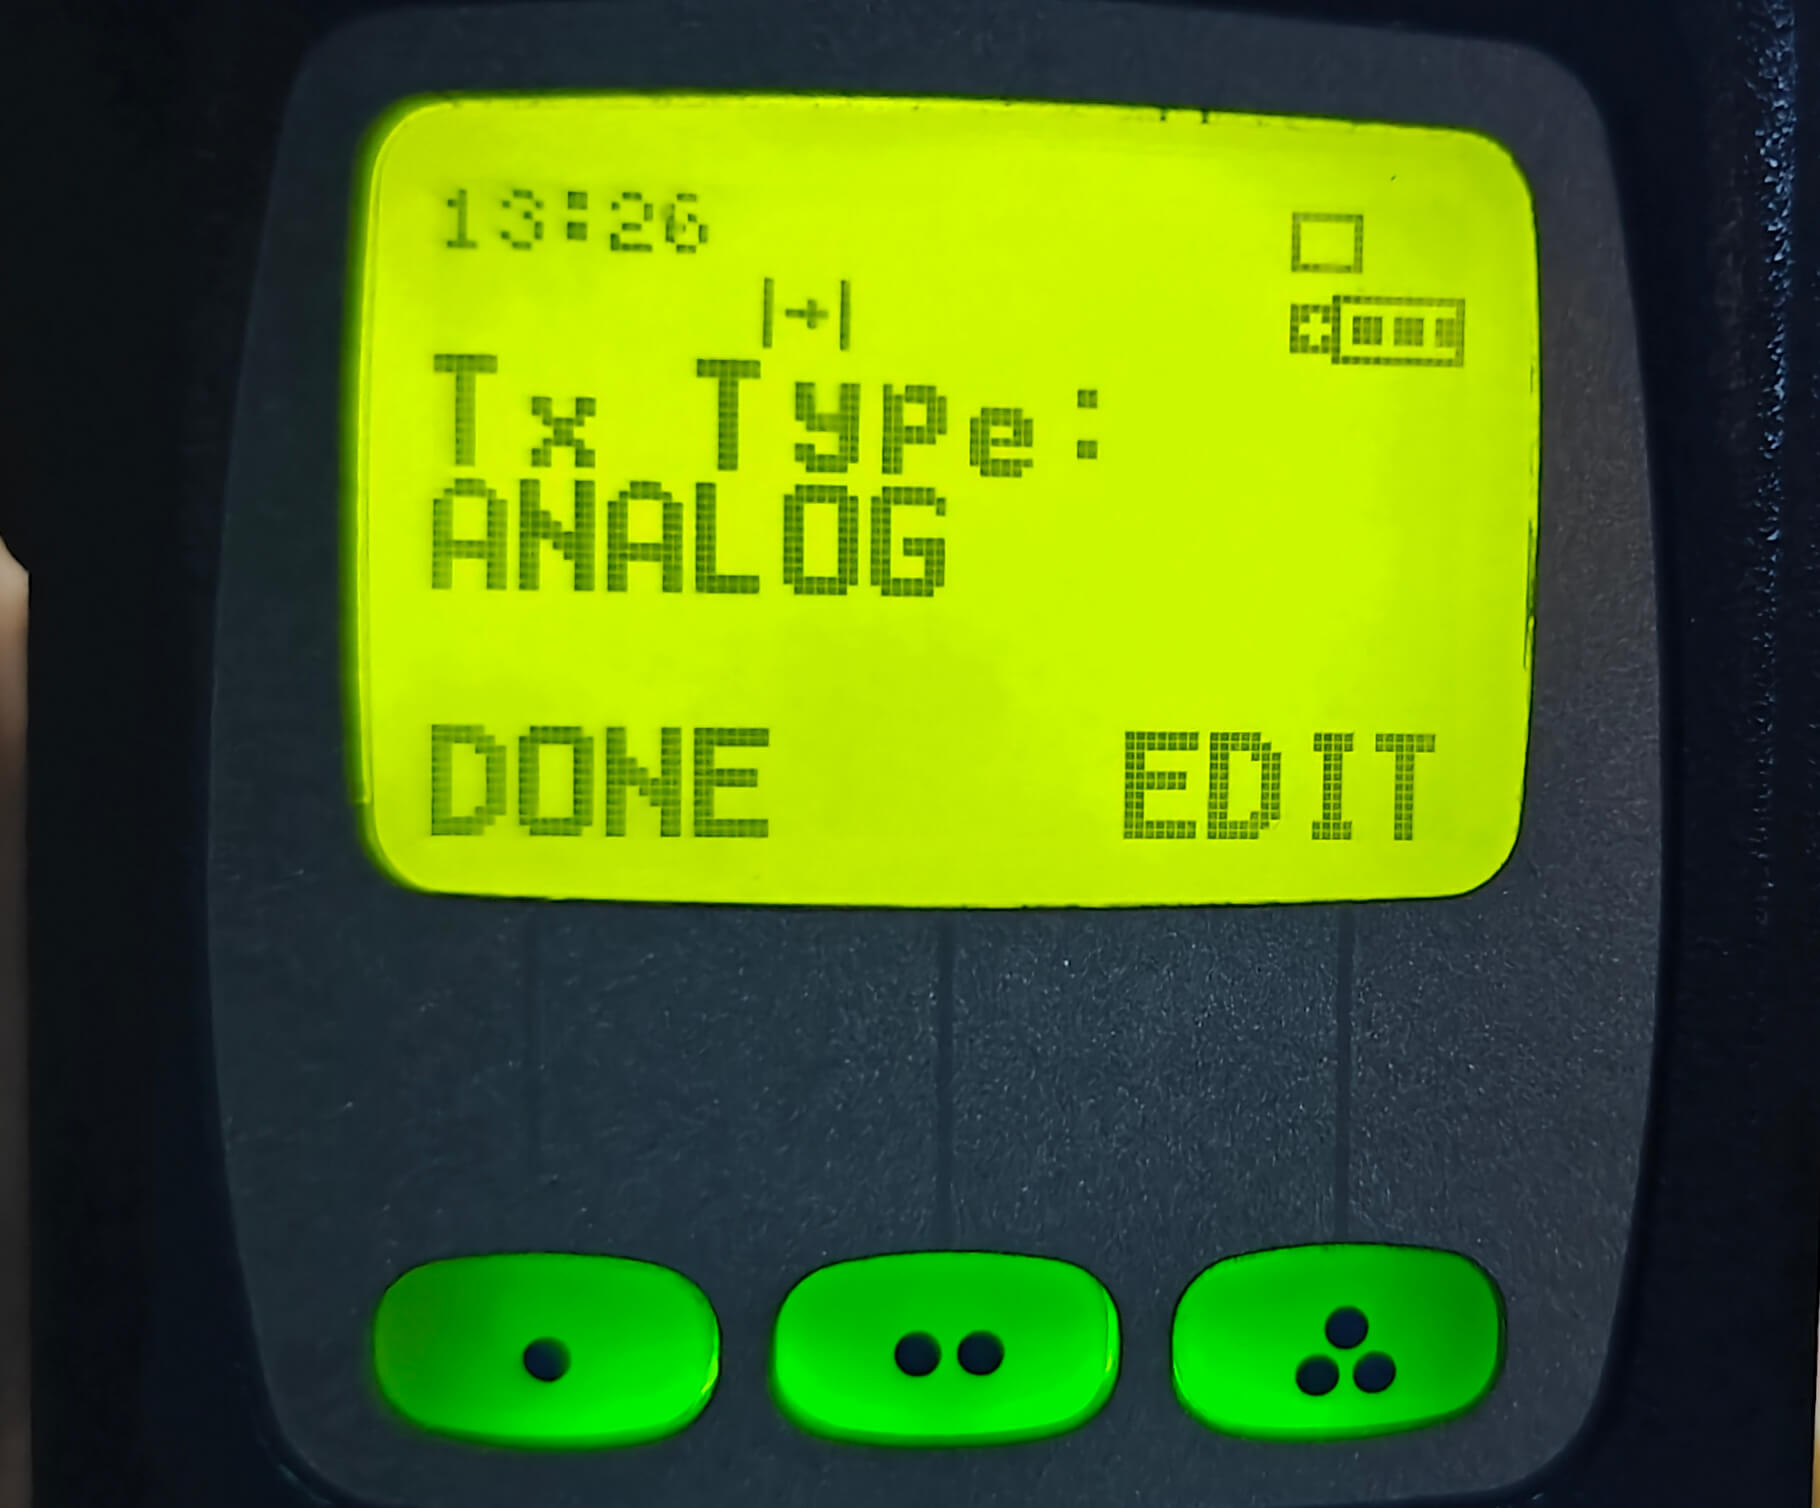
- When you set the receiver channel toMixed ModeAt that time, the current channel's transmission method will becomeDigitalAt this time, the transmitting radio station will act like "QSL card"Similarly, it seems to be connecting to the cluster. After a few seconds, you will hear a sound, and when this happens, manually use FPP (hand-tuned frequency) to set the transmit mode from digital to..." Change to simulation(ANALOG)。

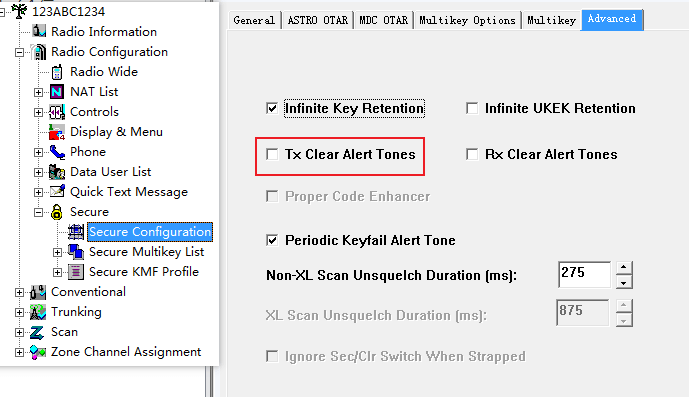
- If your TPT sounds like it's making four beeps instead of three (as shown in the audio below), that's because your machine also has a PTT beep after the TPT. Please configure as shown in the diagram.Disable Tx Clear Alert TonesOkay.
You can listen to the audio version of the original article here:Normal TPT
Or click:Audio link
You can listen to the audio version of the original article here:TPT+ alert sound
Or click:Audio link

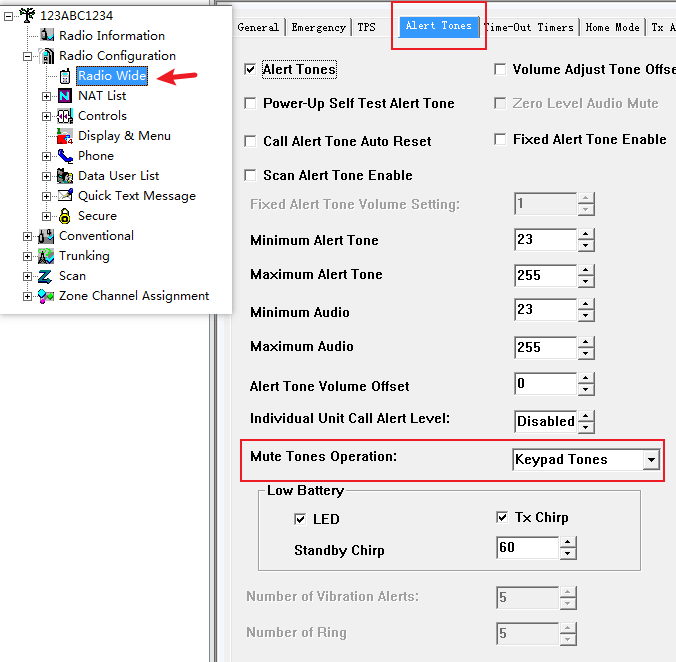
- Via the menuMUTEAfter disabling the notification sound,TPTIt also disappears. (Note: The MUTE option must be added to the menu; see [reference])Radio menu item)
According to the diagram, change this item to the following:Keypad Sounds Okay, (as I understand it, this means setting up thisMUTEWhat does this include? Specifically, it includes both the sound of the initial launch and the sound of the button being pressed, which are set to…Keypad Sounds Subsequently, it will only include the keyboard key press sound and will not affect other notification sounds.

Sound prompt issues
Please refer to the previous question.
Key definitions
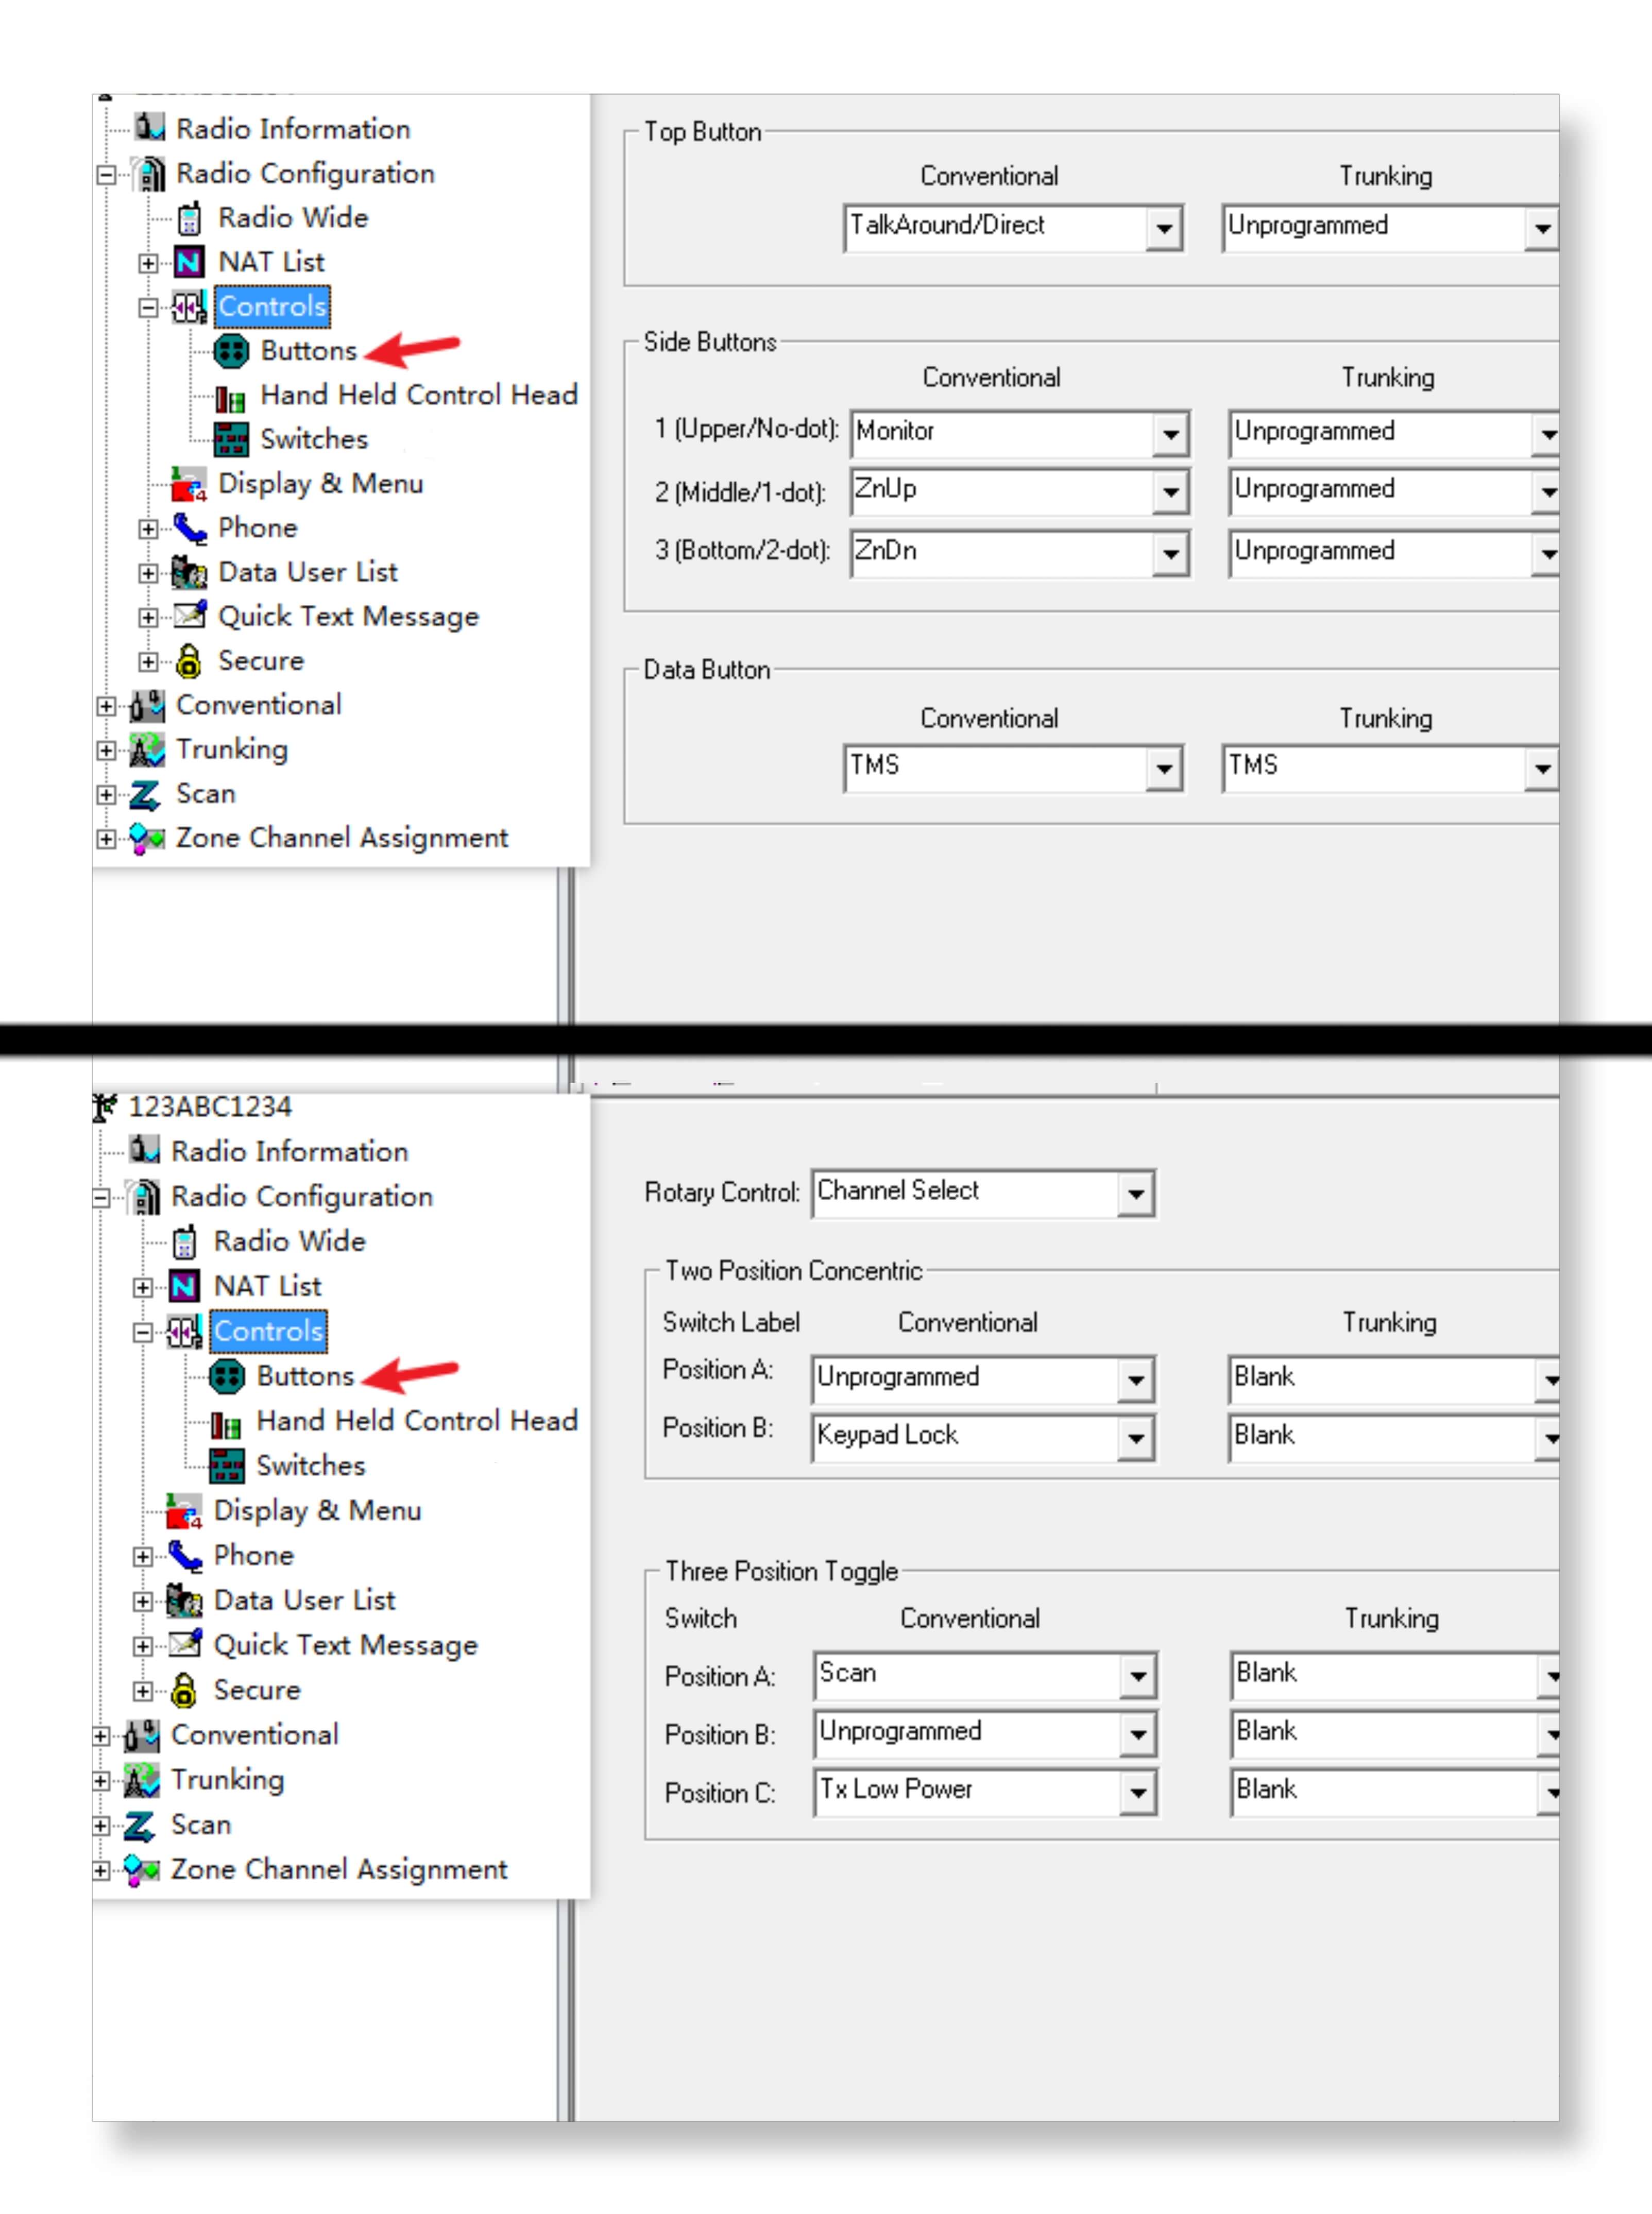
You can set this up at the location shown, in the middle.Handheld control headThis should be about defining the "handy" buttons, and I haven't changed any of the settings. The other terms are just simple English words, so I won't elaborate further. Here's an example of my button configuration:

As mentioned in the previous section, Trunking is a function used when operating in a cluster; we don't need to worry about it here.
Enable channel broadcasting and custom broadcast audio.
Custom channel broadcasts, as shown in the video.
(The first voice sample is from "What are you doing?" recorded two and a half years ago; the second is "贼nm" from 大秦雅音, which embodies the style of Tang Dynasty poetry, thanks to BI9AAZ for providing 大秦雅音)
You can view the video in its original format here:Customized channel broadcast
Or click:Video link
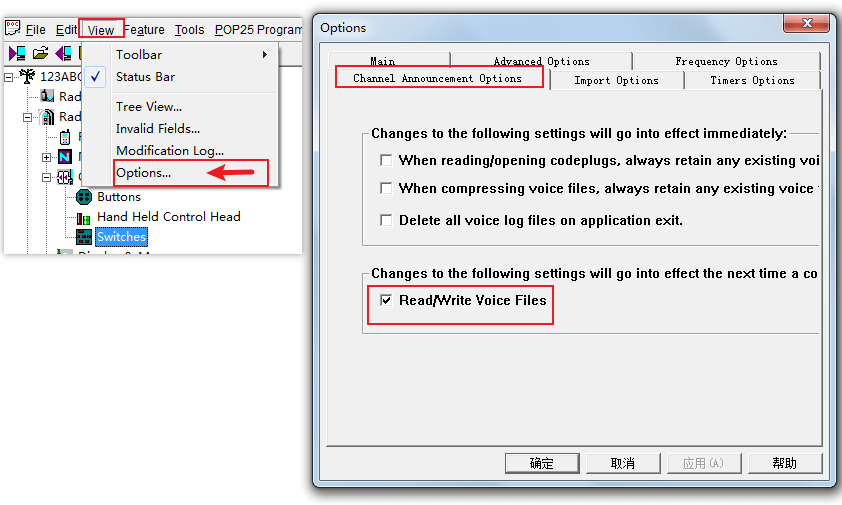
First, when entering the voice recording software, click on.view → Options..., check the boxOptions for announcing a channelBelowRead/Write voice filesClick "OK".

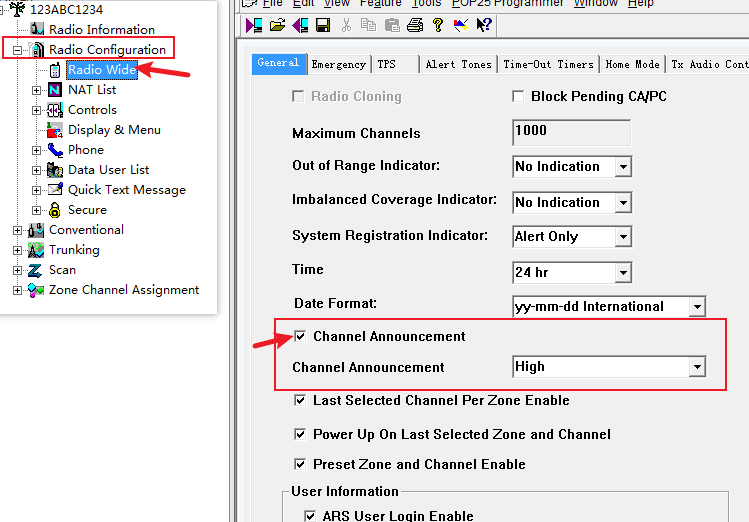
Enable the radio channel broadcasting function, as shown below.HighAndLowChoose based on your mood.

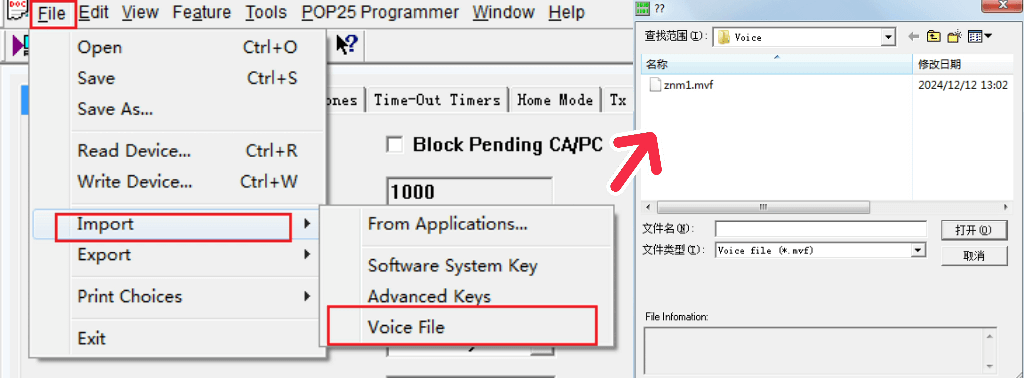
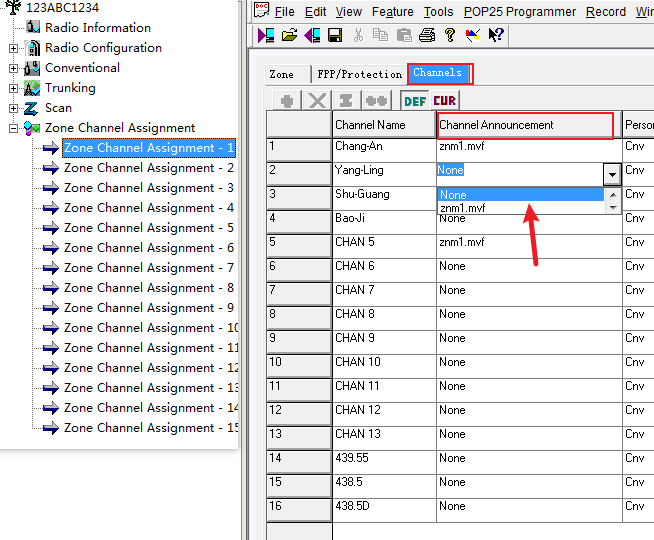
The audio file for this radio station is:.mvfFiles: If you have such audio packages, import them using the method shown in the diagram. You can only import one file at a time.

If you don't have a file, or if you want to customize the audio, you first need to prepare the audio..wavThe format, as the data shows, requires a sampling rate of 8000 Hz, mono, 16-bit audio, and a file size less than 58k. The file size is fine. I used WavePad to create the WAV audio, so the 16-bit aspect didn't matter. Ultimately, it worked successfully.
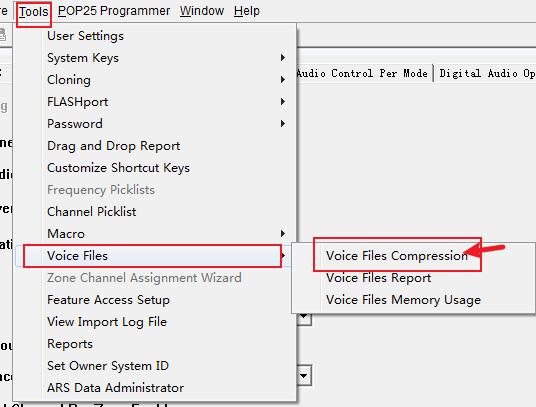
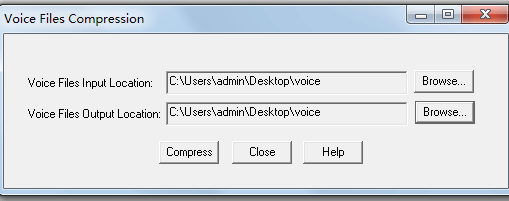
Place the prepared files in an English folder. The frequency software should now be reading the radio and connecting to it (since this format conversion needs to happen within the radio). Now click.Tools → Voice Files → Voice File CompressionClicking on one opens a folder for input and another for output. The output folder can be the same as the input folder, making it easier to find files. After setting up, click.CompressWait for the conversion to complete. If an error occurs, it will prompt you to check the logs; this is likely due to a problem with the WAV file, so please adjust it. After converting, import using the methods described above.


After importing, enter.Channel Assignment by Zone Below Channels, in Channel AnnouncementSelect the voice you want to import, and then click "Write" to save it.

I also have plans to create a few voice packs, so please stay tuned.
To be continued
December 12, 2024
Related attachments
File Description
Firmware (firmware upgrade package)
Astro Saber XTS3000 Depot, Revision R05.02.02 (XTS3000) &(Digital military knife flashing software)
Astro Saber XTS3000 CPS R05.03.00 (XTS3000) &(Digital military knife writing software)
ASTRO 25 Portable Depot, Version 15.00.00 (XTS2500)&XTS5000 handheld radio software)
ASTRO 25 Portable Depot R20.10.00 (XTS2500)&XTS5000 handheld radio software)
ASTRO 25 Portable CPS R20.01.00 (XTS2500)&XTS5000 handheld radio software)
ASTRO 25 Mobile Depot, Version 15.00.00 (XTL5000 Chassis Flashing Software)
ASTRO 25 Mobile CPS R20.01.00 (XTL5000 Vehicle Writing Software)
astro\_xts\_5000\_iii.pdf (English version of the XTS5000 III manual)